> ## Documentation Index
> Fetch the complete documentation index at: https://docs.kinetica.com/llms.txt
> Use this file to discover all available pages before exploring further.
# Adding a Cluster to KAgent
If you have an existing on premise *Kinetica* cluster that is not managed by
*KAgent*, you can add it to *KAgent* without upgrading it. This is particularly
useful in the following scenarios:
* Not all administrative and normal users have direct server-level access to the
nodes in the cluster, and they would like to individually
[manage all relevant services](/content/admin/kagent/manage#kagent-ui-admin)
* Not all administrative users have direct server-level access, and they would
like to schedule and manage [backups and snapshots](/content/admin/kagent/manage#kagent-ui-backups)
and restore from snapshots if necessary
* Users would like to keep track of the valid *Kubernetes Docker* registries
for use with *KML*
The cluster addition process using *KAgent* involves adding key information
about your cluster to *KAgent*, including deployment type, security information,
node information, and current *Kinetica*-related packages/services installed.
Any services (graph, *KML*, *RabbitMQ*, etc.) and/or nodes in the
existing cluster that are not noted during the cluster setup
process will not be automatically picked up by *KAgent* and thus
cannot be managed by *KAgent*. Any services not already installed
cannot be installed during this process; likewise, additional nodes
cannot be added to the cluster during this process.
## KAgent
Before beginning, make sure *KAgent* is [installed](/content/install/kagent).
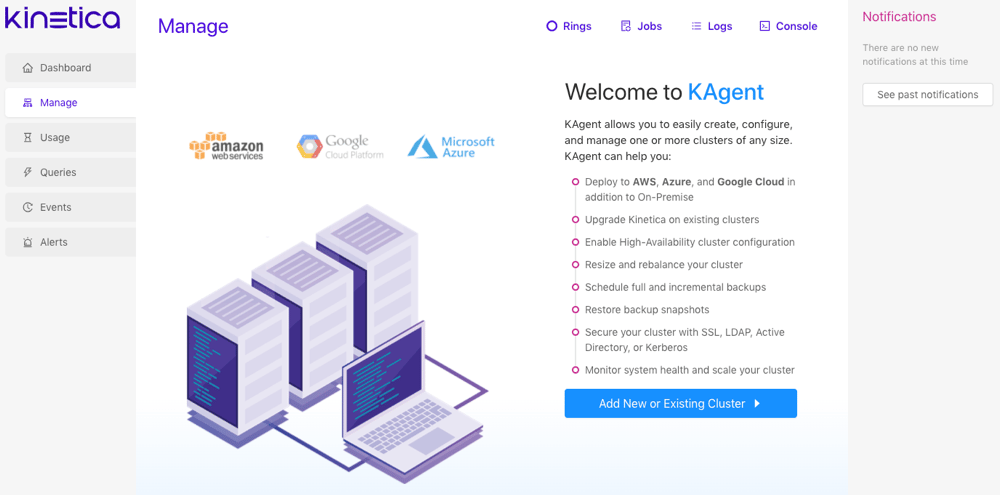 To access the [KAgent UI](/content/admin/kagent/kagent):
1. Ensure the *KAgent* service is started:
```
service kagent_ui status
```
2. Browse to the *KAgent* application using IP or host name:
```
http://:8081/kagent
```
3. If *KAgent* is associated with one or more *Kinetica* clusters, log in using
the credentials for that cluster. If *KAgent* has not been associated with
any clusters yet, the application will load without prompting.
4. Click **Add New or Existing Cluster**.
### Cluster
To access the [KAgent UI](/content/admin/kagent/kagent):
1. Ensure the *KAgent* service is started:
```
service kagent_ui status
```
2. Browse to the *KAgent* application using IP or host name:
```
http://:8081/kagent
```
3. If *KAgent* is associated with one or more *Kinetica* clusters, log in using
the credentials for that cluster. If *KAgent* has not been associated with
any clusters yet, the application will load without prompting.
4. Click **Add New or Existing Cluster**.
### Cluster
 The license key can be the existing *Kinetica* license key or a new license
key. Contact Support ([support@kinetica.com](mailto:support@kinetica.com)) for any questions.
1. Enter a name for the cluster. The name cannot contain spaces or underscores.
2. Optionally, select one or more of the following packages:
* Select **Core** if node(s) in the cluster have the core
database functionality installed on them.
* Select **Graph** if a node in the cluster has the graph
server installed on it. See [Graphs & Solvers Concepts](/content/graph_solver/network_graph_solver) for
more information.
* Optionally, select **KML**
(*Kinetica Machine Learning*) if a node should have *KML* installed on it.
An existing Kubernetes cluster is required for *KML* processing. See
[Machine Learning](/content/ml) for more information on *KML* features.
* Optionally, select **KAgent** if another node in the cluster has
*KAgent* installed on it. See [KAgent](/content/admin/kagent/kagent) for more
information.
* Optionally, select **HA** if the cluster is currently in a ring.
Review [High Availability Architecture](/content/ha/ha_architecture) and [High Availability Configuration & Management](/content/ha/ha_configuration) for more
information.
3. For the **Install Mode**, select **Online** (install
directly from the online Kinetica repository).
4. For the **Version**, select either **CUDA** (GPU) or
**Intel** (CPU-only) depending on the package variant that's
already installed on the current cluster you want to add to KAgent.
Use the following command to determine the Kinetica package that
is already on the machine:
```
# RHEL
rpm -qa | grep 'gpudb'
# Ubuntu
apt list --installed | grep 'gpudb'
```
5. Enter the license key.
6. Optionally, provide an external files directory for use with
[external tables](/content/concepts/external_tables) to override the default
[external files directory](/content/config#config-main-external-files) parameter value.
7. If **KML** is selected to install, upload a configuration file
for an already-existing *Kubernetes* installation. Note that *KML* requires
*Kubernetes*; see [Machine Learning](/content/ml) for more information.
8. Click **Next**.
### Deployment
The license key can be the existing *Kinetica* license key or a new license
key. Contact Support ([support@kinetica.com](mailto:support@kinetica.com)) for any questions.
1. Enter a name for the cluster. The name cannot contain spaces or underscores.
2. Optionally, select one or more of the following packages:
* Select **Core** if node(s) in the cluster have the core
database functionality installed on them.
* Select **Graph** if a node in the cluster has the graph
server installed on it. See [Graphs & Solvers Concepts](/content/graph_solver/network_graph_solver) for
more information.
* Optionally, select **KML**
(*Kinetica Machine Learning*) if a node should have *KML* installed on it.
An existing Kubernetes cluster is required for *KML* processing. See
[Machine Learning](/content/ml) for more information on *KML* features.
* Optionally, select **KAgent** if another node in the cluster has
*KAgent* installed on it. See [KAgent](/content/admin/kagent/kagent) for more
information.
* Optionally, select **HA** if the cluster is currently in a ring.
Review [High Availability Architecture](/content/ha/ha_architecture) and [High Availability Configuration & Management](/content/ha/ha_configuration) for more
information.
3. For the **Install Mode**, select **Online** (install
directly from the online Kinetica repository).
4. For the **Version**, select either **CUDA** (GPU) or
**Intel** (CPU-only) depending on the package variant that's
already installed on the current cluster you want to add to KAgent.
Use the following command to determine the Kinetica package that
is already on the machine:
```
# RHEL
rpm -qa | grep 'gpudb'
# Ubuntu
apt list --installed | grep 'gpudb'
```
5. Enter the license key.
6. Optionally, provide an external files directory for use with
[external tables](/content/concepts/external_tables) to override the default
[external files directory](/content/config#config-main-external-files) parameter value.
7. If **KML** is selected to install, upload a configuration file
for an already-existing *Kubernetes* installation. Note that *KML* requires
*Kubernetes*; see [Machine Learning](/content/ml) for more information.
8. Click **Next**.
### Deployment
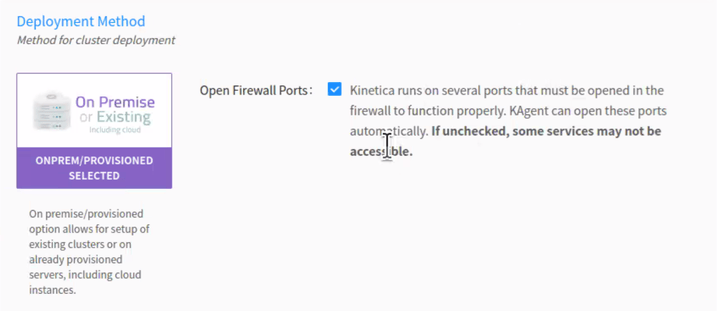 1. Select the **On Premise** deployment method, and click
**Next**.
If clearing the **Open Firewall Ports** checkbox, the firewall
then must be configured manually to allow the *required* ports listed in
the [default ports](/content/install/shared/ports) table. Consult
[Adjust Firewall](/content/install/shared/adjust_firewall) for tips on configuring the firewall.
### Security
1. Select the **On Premise** deployment method, and click
**Next**.
If clearing the **Open Firewall Ports** checkbox, the firewall
then must be configured manually to allow the *required* ports listed in
the [default ports](/content/install/shared/ports) table. Consult
[Adjust Firewall](/content/install/shared/adjust_firewall) for tips on configuring the firewall.
### Security
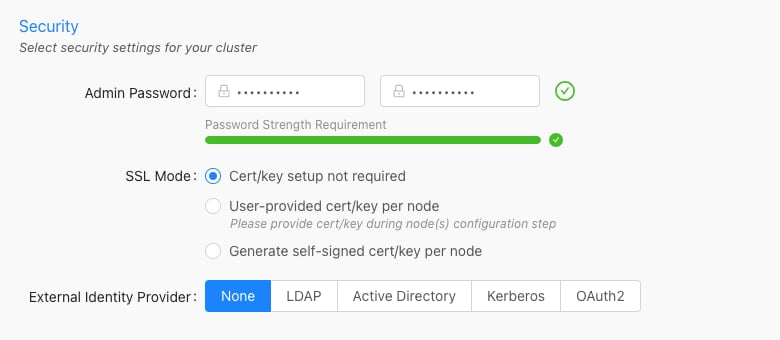 1. Enter and confirm the existing **Admin Password**. This is the
password used to access *Reveal*, *Workbench*, *KAgent*, and *GAdmin* as the
default administrative user.
The password provided here must match the existing cluster's admin
password.
2. Select an **SSL Mode** that best aligns with the existing cluster's
SSL configuration:
* **Cert/key setup not required** -- *Kinetica* will not require
SSL certificate/key creation/upload but there will be no updates to
security configuration settings
* **User-provided cert/key per node** -- user must upload an SSL
certificate and key for each node; *Kinetica* copies the cert/key pair
to /opt/gpudb/certs, enables HTTPD, and configures HTTPD to use
HTTPS
* **Generate self-signed cert/key per node** -- *KAgent* generates
a self-signed certificate and key for each node and places it in
/opt/gpudb/certs, enables HTTPD, and configures HTTPD to use HTTPS
3. Select the current **Authentication** type used for the existing
cluster and fill the fields as necessary:
* **None** -- no authentication or authorization
* **LDAP** -- configures *Kinetica* to authenticate via *LDAP*;
requires authentication to connect to the database, enables authorization,
enables external authentication, automatically creates users in the
database for *LDAP* users, and automatically grants roles in the database
to *LDAP* users
* **Active Directory** -- configures *Kinetica* to authenticate via
*Microsoft Active Directory*; requires authentication to connect to the
database, enables authorization, enables external authentication,
automatically creates users in the database for *Active Directory* users,
and automatically grants roles in the database to *Active Directory* users
* **Kerberos** -- configures *Kinetica* to authenticate via
*Kerberos*; requires authentication to connect to the database, enables
authorization, enables external authentication, automatically creates users
in the database for *Kerberos* users, and automatically grants roles in the
database to *Kerberos* users
4. Click **Next**.
### Nodes
1. Enter and confirm the existing **Admin Password**. This is the
password used to access *Reveal*, *Workbench*, *KAgent*, and *GAdmin* as the
default administrative user.
The password provided here must match the existing cluster's admin
password.
2. Select an **SSL Mode** that best aligns with the existing cluster's
SSL configuration:
* **Cert/key setup not required** -- *Kinetica* will not require
SSL certificate/key creation/upload but there will be no updates to
security configuration settings
* **User-provided cert/key per node** -- user must upload an SSL
certificate and key for each node; *Kinetica* copies the cert/key pair
to /opt/gpudb/certs, enables HTTPD, and configures HTTPD to use
HTTPS
* **Generate self-signed cert/key per node** -- *KAgent* generates
a self-signed certificate and key for each node and places it in
/opt/gpudb/certs, enables HTTPD, and configures HTTPD to use HTTPS
3. Select the current **Authentication** type used for the existing
cluster and fill the fields as necessary:
* **None** -- no authentication or authorization
* **LDAP** -- configures *Kinetica* to authenticate via *LDAP*;
requires authentication to connect to the database, enables authorization,
enables external authentication, automatically creates users in the
database for *LDAP* users, and automatically grants roles in the database
to *LDAP* users
* **Active Directory** -- configures *Kinetica* to authenticate via
*Microsoft Active Directory*; requires authentication to connect to the
database, enables authorization, enables external authentication,
automatically creates users in the database for *Active Directory* users,
and automatically grants roles in the database to *Active Directory* users
* **Kerberos** -- configures *Kinetica* to authenticate via
*Kerberos*; requires authentication to connect to the database, enables
authorization, enables external authentication, automatically creates users
in the database for *Kerberos* users, and automatically grants roles in the
database to *Kerberos* users
4. Click **Next**.
### Nodes
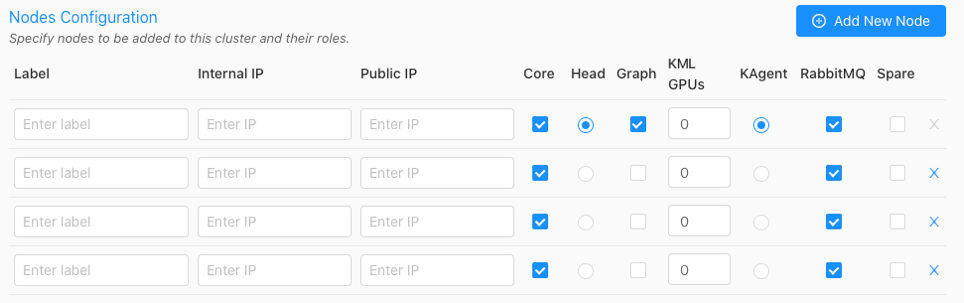 1. Click **Add New Node** until the number of nodes in *KAgent* matches
the number of nodes in the current cluster.
2. Input a custom **Label** (*hostname* is suggested), the
**Internal IP**, and the **External IP** for each existing
node into *KAgent*.
3. If the `User-provided cert/key per node` **SSL Mode**
was selected in [Security](#security), an **SSL** column will be added to the
configuration page--click the lock icon in the **SSL** column to open
the **SSL Certificate/Key** window, where the SSL cert and key, along
with an optional public hostname, can be provided. Repeat this for each node.
4. Select each node that has the **Core** package installed.
5. For the existing *head node* host, designate it as the *head node* in
*KAgent* by selecting the **Head Node** radio button next to it.
6. If the *Graph* package was selected for install in [Cluster](#cluster)
and existing node(s) hosts a graph server, designate it as a
**Graph** node using the corresponding radio button. The *graph*
*node(s)* hosts the [graph server](/content/graph_solver/network_graph_solver).
The *graph node* does not need to have the **Core** package enabled.
7. To reserve GPUs for *KML*, *UDFs*, or other external processes that may be
running on the node, set the number under *KML GPUs*.
Some *UDFs* and features of *KML* may require GPUs to work or
have increased performance.
8. If the *RabbitMQ* package was selected for install in
[Cluster](#cluster) because a [High Availability](/content/ha)
setup is already enabled, select the node(s) that have **RabbitMQ**
installed.
9. Click **Next**.
10. Confirm which IP address KAgent should use to connect to the cluster:
**Internal** or **Public**.
### Credentials
1. Click **Add New Node** until the number of nodes in *KAgent* matches
the number of nodes in the current cluster.
2. Input a custom **Label** (*hostname* is suggested), the
**Internal IP**, and the **External IP** for each existing
node into *KAgent*.
3. If the `User-provided cert/key per node` **SSL Mode**
was selected in [Security](#security), an **SSL** column will be added to the
configuration page--click the lock icon in the **SSL** column to open
the **SSL Certificate/Key** window, where the SSL cert and key, along
with an optional public hostname, can be provided. Repeat this for each node.
4. Select each node that has the **Core** package installed.
5. For the existing *head node* host, designate it as the *head node* in
*KAgent* by selecting the **Head Node** radio button next to it.
6. If the *Graph* package was selected for install in [Cluster](#cluster)
and existing node(s) hosts a graph server, designate it as a
**Graph** node using the corresponding radio button. The *graph*
*node(s)* hosts the [graph server](/content/graph_solver/network_graph_solver).
The *graph node* does not need to have the **Core** package enabled.
7. To reserve GPUs for *KML*, *UDFs*, or other external processes that may be
running on the node, set the number under *KML GPUs*.
Some *UDFs* and features of *KML* may require GPUs to work or
have increased performance.
8. If the *RabbitMQ* package was selected for install in
[Cluster](#cluster) because a [High Availability](/content/ha)
setup is already enabled, select the node(s) that have **RabbitMQ**
installed.
9. Click **Next**.
10. Confirm which IP address KAgent should use to connect to the cluster:
**Internal** or **Public**.
### Credentials
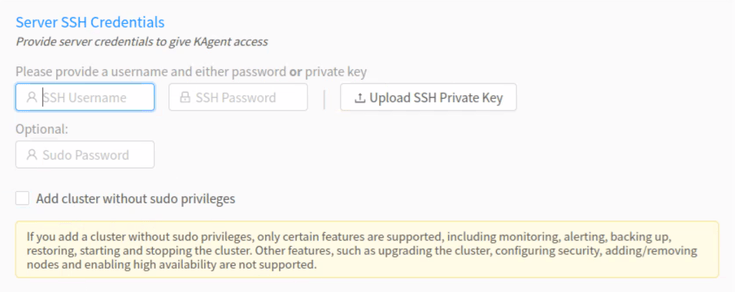 1. For the **Server SSH Credentials**, enter the SSH username and
password or upload the SSH private key that will be used to access the
node(s).
2. Optionally, enter the `sudo` password.
3. Click **Verify**.
The [console](/content/admin/kagent/manage#kagent-ui-console) will appear showing the log of *KAgent*
interactions as *KAgent* attempts to access the cluster with the provided
credentials and also retrieve information on the hosts, including Kinetica
version and configuration (if installed), hostname and IP addresses, OS type,
and Nvidia information.
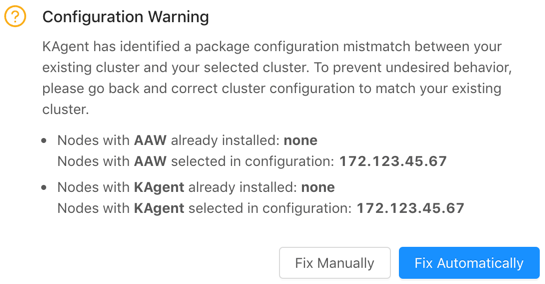
If the configuration you have selected does not match the
current configuration on the cluster you're trying to upgrade,
*KAgent* will list the errors and provide the opportunity to fix
the configuration manually or automatically.
1. For the **Server SSH Credentials**, enter the SSH username and
password or upload the SSH private key that will be used to access the
node(s).
2. Optionally, enter the `sudo` password.
3. Click **Verify**.
The [console](/content/admin/kagent/manage#kagent-ui-console) will appear showing the log of *KAgent*
interactions as *KAgent* attempts to access the cluster with the provided
credentials and also retrieve information on the hosts, including Kinetica
version and configuration (if installed), hostname and IP addresses, OS type,
and Nvidia information.
If the configuration you have selected does not match the
current configuration on the cluster you're trying to upgrade,
*KAgent* will list the errors and provide the opportunity to fix
the configuration manually or automatically.
 ### Add Cluster
Existing cluster version information will be detected and the
**Add Only +** button will be activated.
1. Review the **Add Summary** to ensure there are no validation
errors in the information.
2. Click **Add Only +**. *KAgent* will open a window displaying the
progress of the cluster addition.
After a successful cluster addition, you'll be returned to the *KAgent* home
page and also will be offered to be redirected to *GAdmin* on the head node.
Review [KAgent](/content/admin/kagent/kagent) for more information on using *KAgent*.
After the addition, the cluster will be added to *KAgent*
and you'll be logged into *KAgent* as the `admin` user for the
cluster. After this session is over (via either logging out or
session timeout), you'll be required to log into *KAgent* every
time you want to access *KAgent* features. See
[Logging In / Out](/content/admin/kagent/kagent#kagent-ui-logout) for more information.
### Add Cluster
Existing cluster version information will be detected and the
**Add Only +** button will be activated.
1. Review the **Add Summary** to ensure there are no validation
errors in the information.
2. Click **Add Only +**. *KAgent* will open a window displaying the
progress of the cluster addition.
After a successful cluster addition, you'll be returned to the *KAgent* home
page and also will be offered to be redirected to *GAdmin* on the head node.
Review [KAgent](/content/admin/kagent/kagent) for more information on using *KAgent*.
After the addition, the cluster will be added to *KAgent*
and you'll be logged into *KAgent* as the `admin` user for the
cluster. After this session is over (via either logging out or
session timeout), you'll be required to log into *KAgent* every
time you want to access *KAgent* features. See
[Logging In / Out](/content/admin/kagent/kagent#kagent-ui-logout) for more information.