> ## Documentation Index
> Fetch the complete documentation index at: https://docs.kinetica.com/llms.txt
> Use this file to discover all available pages before exploring further.
# Data Explorer
The *Data Explorer* can be used to manage most object types.
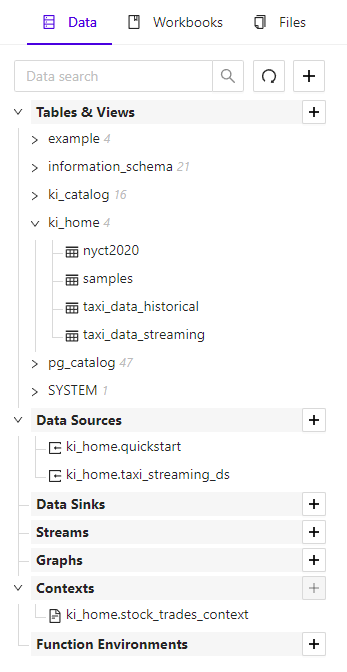 To access the *Data Explorer*, in [Workbench](/content/admin/workbench),
click the **Data** tab of the left-hand navigation pane.
## General Features
At the top of the *Data Explorer* tab are actions not tied to a specific object
type:
* Search box - filters displayed objects across all three domains, by keyword
* Refresh icon - refreshes the list of displayed objects
* **+** icon - adds a new data object
## Tables & Views
This section of the *Data Explorer* shows the list of accessible
[schemas](/content/sql/ddl#sql-create-schema) at the top level, and beneath each,
the set of accessible [tables](/content/sql/ddl#sql-create-table) and
[views](/content/sql/ddl#sql-create-view).
Clicking the **+** next to this section's header will open the
context menu, allowing any of the following objects to be created, via wizard:
* [Schema](/content/sql/ddl#sql-create-schema)
* [Table](/content/sql/ddl#sql-create-table)
* [External Table](/content/sql/ddl#sql-create-ext-table)
### Schema Services
Clicking on a schema will open a context menu with the following options:
* **Add New Table** - create a table under this schema
* **Rename** - rename this schema
* **Delete** - delete this schema and all tables & views within
### Table/View Services
Clicking on a table or view will open up a menu with these options:
* **Info** - display general information about this object and
its composition
* **Data Preview** - display a grid-style view of this object's
data
* **WMS Preview** - display a map-style view of this object, if
it contains geospatial data
* Click **Config** to modify the settings of the map
* Click **Update** to view the map
* Click **Save PNG** to save a local copy of the rendered
map
* Click the refresh icon to update the data on the map
* **Configure** -
[modify](/content/admin/workbench/ui/explorer/data#wb-explorer-data-tv-config) the structure of and access
to this object
* **Add Record** - add a single record to this table
* **Export File** - exports the table to
[KiFS](/content/admin/workbench/ui/explorer/files)
* **SQL DDL** - display the SQL `CREATE` statement used to
construct this object
* **Statistics** - generate a per-column statistical analysis of
this object
* **Refresh** - refresh the data in a
[materialized view](/content/sql/ddl#sql-create-materialized-view) or
[external table](/content/sql/ddl#sql-create-ext-table)
* **Rename** - rename this object
* **Move** - move this object to a different schema
* **Delete** - delete this object permanently
* **Multi-Select** - turn on multi-select mode, which allows
multiple objects to be selected (by checking the boxes in front of them) and
then deleted by clicking **Delete Selected**; click
**Cancel** to turn off multi-select mode
#### Configuring a Table/View
A table can be configured upon creation and subsequently modified, from the
[Data Explorer](/content/admin/workbench/ui/explorer/data) in [Workbench](/content/admin/workbench), including
setting
[column-level security](/content/security/sec_concepts#sec-concepts-perm-table-col) on the table.
Both creating and modifying a table go through the same two steps. In the first
step the following can be modified:
* **Schema** - name of the schema to put this table in (only
available for new tables)
* **Name** - new name for the table (must meet
[table naming criteria](/content/concepts/tables#table-naming-criteria))
* Via the **Advanced** button, the following can be viewed:
* **Chunk Size** - the designated number of records per block
of allocated memory for this table
* **Dimension Table** - whether or not this table is
[replicated](/content/concepts/tables#replicated), as dimension tables in a star or
snowflake schema will usually be
* **Temporary Table** - whether or not this table will be
removed upon cluster restart
* **Time To Live** - the [TTL](/content/concepts/ttl)
(expiration time, in minutes) for the table; leave blank for permanent table
* **Foreign Keys** - one or more
[foreign key](/content/concepts/tables#foreign-key) definitions, of the form:
```sql theme={null}
() REFERENCES () [AS ] [,...]
```
* **Foreign Shard Key** - one or more *foreign shard key*
definitions
* **Partitioning** - optional
[partition](/content/concepts/tables#partitioning) definition:
* **Type** - type of *partitioning* scheme to use
* **Keys** - column(s) and/or column expression(s) that will
be used to determine the designated *partition* for each record
* **Definitions** - type-specific definitions for the set of
*partitions* or the *partition* creation scheme
Clicking **Next** will bring up the second step, where the table
structure and
column
security are defined.
* **+ Add Column** - add a new column to the end of the table,
where the following are specified:
* **Name** - name of this column (must meet
[column naming criteria](/content/concepts/tables#table-naming-criteria))
* **Type** - [data type](/content/concepts/types#types-chart) of this
column
* **Nullable** - whether this column can accept null values
* **Primary Key** - optionally designate this column as a
[primary key](/content/concepts/tables#primary-key) or a member of a
*composite primary key*
* **Shard Key** - optionally designate this column as a
[shard key](/content/concepts/tables#shard-key) or a member of a
*composite shard key*
* **Dictionary Encode** - whether to apply
[dictionary encoding](/content/concepts/dictionary_encoding) to this
column
[full-text searchable](/content/concepts/full_text_search)
* **Init with Now** - whether this column's value should be
initialized to the current date/time if blank when inserted
* **Init with UUID** - whether this column's value should be
initialized to a *universally unique identifier* (UUID) if blank when
inserted
* **Text Search** - whether this column should be
*
To access the *Data Explorer*, in [Workbench](/content/admin/workbench),
click the **Data** tab of the left-hand navigation pane.
## General Features
At the top of the *Data Explorer* tab are actions not tied to a specific object
type:
* Search box - filters displayed objects across all three domains, by keyword
* Refresh icon - refreshes the list of displayed objects
* **+** icon - adds a new data object
## Tables & Views
This section of the *Data Explorer* shows the list of accessible
[schemas](/content/sql/ddl#sql-create-schema) at the top level, and beneath each,
the set of accessible [tables](/content/sql/ddl#sql-create-table) and
[views](/content/sql/ddl#sql-create-view).
Clicking the **+** next to this section's header will open the
context menu, allowing any of the following objects to be created, via wizard:
* [Schema](/content/sql/ddl#sql-create-schema)
* [Table](/content/sql/ddl#sql-create-table)
* [External Table](/content/sql/ddl#sql-create-ext-table)
### Schema Services
Clicking on a schema will open a context menu with the following options:
* **Add New Table** - create a table under this schema
* **Rename** - rename this schema
* **Delete** - delete this schema and all tables & views within
### Table/View Services
Clicking on a table or view will open up a menu with these options:
* **Info** - display general information about this object and
its composition
* **Data Preview** - display a grid-style view of this object's
data
* **WMS Preview** - display a map-style view of this object, if
it contains geospatial data
* Click **Config** to modify the settings of the map
* Click **Update** to view the map
* Click **Save PNG** to save a local copy of the rendered
map
* Click the refresh icon to update the data on the map
* **Configure** -
[modify](/content/admin/workbench/ui/explorer/data#wb-explorer-data-tv-config) the structure of and access
to this object
* **Add Record** - add a single record to this table
* **Export File** - exports the table to
[KiFS](/content/admin/workbench/ui/explorer/files)
* **SQL DDL** - display the SQL `CREATE` statement used to
construct this object
* **Statistics** - generate a per-column statistical analysis of
this object
* **Refresh** - refresh the data in a
[materialized view](/content/sql/ddl#sql-create-materialized-view) or
[external table](/content/sql/ddl#sql-create-ext-table)
* **Rename** - rename this object
* **Move** - move this object to a different schema
* **Delete** - delete this object permanently
* **Multi-Select** - turn on multi-select mode, which allows
multiple objects to be selected (by checking the boxes in front of them) and
then deleted by clicking **Delete Selected**; click
**Cancel** to turn off multi-select mode
#### Configuring a Table/View
A table can be configured upon creation and subsequently modified, from the
[Data Explorer](/content/admin/workbench/ui/explorer/data) in [Workbench](/content/admin/workbench), including
setting
[column-level security](/content/security/sec_concepts#sec-concepts-perm-table-col) on the table.
Both creating and modifying a table go through the same two steps. In the first
step the following can be modified:
* **Schema** - name of the schema to put this table in (only
available for new tables)
* **Name** - new name for the table (must meet
[table naming criteria](/content/concepts/tables#table-naming-criteria))
* Via the **Advanced** button, the following can be viewed:
* **Chunk Size** - the designated number of records per block
of allocated memory for this table
* **Dimension Table** - whether or not this table is
[replicated](/content/concepts/tables#replicated), as dimension tables in a star or
snowflake schema will usually be
* **Temporary Table** - whether or not this table will be
removed upon cluster restart
* **Time To Live** - the [TTL](/content/concepts/ttl)
(expiration time, in minutes) for the table; leave blank for permanent table
* **Foreign Keys** - one or more
[foreign key](/content/concepts/tables#foreign-key) definitions, of the form:
```sql theme={null}
() REFERENCES () [AS ] [,...]
```
* **Foreign Shard Key** - one or more *foreign shard key*
definitions
* **Partitioning** - optional
[partition](/content/concepts/tables#partitioning) definition:
* **Type** - type of *partitioning* scheme to use
* **Keys** - column(s) and/or column expression(s) that will
be used to determine the designated *partition* for each record
* **Definitions** - type-specific definitions for the set of
*partitions* or the *partition* creation scheme
Clicking **Next** will bring up the second step, where the table
structure and
column
security are defined.
* **+ Add Column** - add a new column to the end of the table,
where the following are specified:
* **Name** - name of this column (must meet
[column naming criteria](/content/concepts/tables#table-naming-criteria))
* **Type** - [data type](/content/concepts/types#types-chart) of this
column
* **Nullable** - whether this column can accept null values
* **Primary Key** - optionally designate this column as a
[primary key](/content/concepts/tables#primary-key) or a member of a
*composite primary key*
* **Shard Key** - optionally designate this column as a
[shard key](/content/concepts/tables#shard-key) or a member of a
*composite shard key*
* **Dictionary Encode** - whether to apply
[dictionary encoding](/content/concepts/dictionary_encoding) to this
column
[full-text searchable](/content/concepts/full_text_search)
* **Init with Now** - whether this column's value should be
initialized to the current date/time if blank when inserted
* **Init with UUID** - whether this column's value should be
initialized to a *universally unique identifier* (UUID) if blank when
inserted
* **Text Search** - whether this column should be
*  - set
[column-level security](/content/admin/workbench/ui/explorer/data#wb-explorer-data-tv-config-cls) on
this column for users/roles
*
- set
[column-level security](/content/admin/workbench/ui/explorer/data#wb-explorer-data-tv-config-cls) on
this column for users/roles
*  - remove this column from the table
Column-Level Security
When the *Column Permissions* is clicked for a column on the
table create/edit *Column Definitions* page, the
**Column Permissions** pop-up will appear.
Click the name of a user or role on the left pane to show the corresponding
*column-level permissions* that user/role has on this table in the right pane,
and configure them:
* **Enabled** - toggle whether *column-level permissions* on this
table's column are active for the selected user/role; this will grant the
selected user access to this column's data
* **Filter** - enter the filter expression that should be used to
define the records in this column the selected user **can** access;
effectively adding *row-level security* to this column
* **Transform Type** - optionally, character-based column values
can have one of two transform functions applied in order to conceal the true
values from the user/role to whom the access is granted:
* **Obfuscate** - conceal text values by converting them to
"random" whole numbers, where all occurrences of a given text value will
convert to the same number
* **Mask** - conceal text values by replacing one or more
sequential characters in the text value with a single "masking" character:
* **Start Position** - the 1-based position of the first
character to mask
* **# of Masked Characters** - the number of characters after
(and including) the first one to replace with the masking character
* **Mask Character** - the character used to replace column
value characters
Click **OK** once all *column-level security* modifications have
been made.
See [Column-Level Security](/content/security/sec_concepts#sec-concepts-perm-table-col) for details.
## Data Sources
This section of the *Data Explorer* shows the list of accessible
[data sources](/content/sql/ddl#sql-create-data-source).
Clicking the **+** next to this section's header will open the
**Create Data Source** wizard. Provide a name, source
provider/service, and the relevant connection information, and then click
**Create** to create the data source.
Clicking on a data source will open a context menu with the following options:
* **Configure** - modify this data source's reference to its
external source
* **Import** - opens the [Import](/content/admin/workbench/ui/import) tool
specific to this data source
* **History** - displays the history of load commands issued
through this data source
* **Delete** - delete this data source, provided it is unused by
any other objects
* **Multi-Select** - turn on multi-select mode, which allows
multiple objects to be selected (by checking the boxes in front of them) and
then deleted by clicking **Delete Selected**; click
**Cancel** to turn off multi-select mode
## Data Sinks
This section of the *Data Explorer* shows the list of accessible
[data sinks](/content/sql/ddl#sql-create-data-sink).
Clicking the **+** next to this section's header will open the
**Create Data Sink** wizard. Provide a name, target
provider/service, and the relevant connection information, and then click
**Create** to create the data sink.
Clicking on a data sink will open a context menu with the following options:
* **Configure** - modify this data sink's reference to its
external target
* **Stream** - opens the **Create Stream** wizard
using this data sink as its target
* **Delete** - delete this data sink, provided it is unused by
any other objects
* **Multi-Select** - turn on multi-select mode, which allows
multiple objects to be selected (by checking the boxes in front of them) and
then deleted by clicking **Delete Selected**; click
**Cancel** to turn off multi-select mode
## Streams
This section of the *Data Explorer* shows the list of accessible
[streams](/content/sql/ddl#sql-create-stream).
Clicking the **+** next to this section's header will open the
**Create Stream** wizard. Provide a name, target data sink,
source object and streaming configuration, and then click
**Create** to create the stream.
Clicking on a stream will open a context menu with the following options:
* **Info** - view this stream's configuration
* **Delete** - delete this stream
* **Multi-Select** - turn on multi-select mode, which allows
multiple objects to be selected (by checking the boxes in front of them) and
then deleted by clicking **Delete Selected**; click
**Cancel** to turn off multi-select mode
## Graphs
This section of the *Data Explorer* shows the list of accessible
[graphs](/content/sql/graph#sql-graph-create).
Clicking the **+** next to this section's header will open the
**Create Graph** wizard.
Select whether to create a graph manually from an existing table or to create a
graph as an extract from the *OpenStreetMap (OSM)* dataset.
* For a manual graph:
* On the **Configure** page, provide a name, directedness, and
graph structure options. Click the drop-down next to
**Nodes**, **Edges**,
**Weights**, and/or **Restrictions** to select
the [identifier combination](/content/graph_solver/network_graph_solver#id-combos) to use for this
component of the graph and click **+ Add** to use it. Then
enter the source database columns (or constants) to use for each
[identifier](/content/graph_solver/network_graph_solver#identifiers) listed. Click the trash can icon to
remove the selected identifier combination.
To proceed, click:
* **Next** to continue to the **Options** page
* **Change Mode** to return to the mode selection page
* **Cancel** to not create the graph
* On the **Options** page, specify any additional parameters that
will define the graph.
To proceed, click:
* **Create Graph** to finish and create the graph
* **Back** to return to the **Configure** page
* **Change Mode** to return to the mode selection page
* **Cancel** to not create the graph
* For an OSM extract:
* Provide a name for the graph and select a region on the map from which the
graph will be created. Use the controls within the map widget to zoom and
pan to the region of interest. Note that the default data set provided is
the United States road network.
To proceed, click:
* **Create Graph** to finish and create the graph
* **Change Mode** to return to the mode selection page
* **Cancel** to not create the graph
Clicking on a graph will open up a menu with these options:
* **Info** - display general information about this graph and its
composition
* **Preview** - display a map-style view of this graph, if it
contains geospatial data
* **Delete** - delete this graph
* **Multi-Select** - turn on multi-select mode, which allows
multiple objects to be selected (by checking the boxes in front of them) and
then deleted by clicking **Delete Selected**; click
**Cancel** to turn off multi-select mode
## Context
This section of the *Data Explorer* shows the list of accessible
[contexts](/content/sql/sqlgpt#sql-gpt-create-context).
Clicking on a *context* will open a context menu with the following options:
* **Info** - view this *context's* configuration
* **Delete** - delete this *context*
* **Multi-Select** - turn on multi-select mode, which allows
multiple objects to be selected (by checking the boxes in front of them) and
then deleted by clicking **Delete Selected**; click
**Cancel** to turn off multi-select mode
## Function Environments
This section of the *Data Explorer* shows the list of accessible
[Python UDF function environments](/content/udf/python/writing#udf-python-func-env).
Clicking the **+** next to this section's header will open the
**Create Function Environment** wizard, allowing an environment
to be created containing user-specified Python packages & versions.
Clicking on a *function environment* will open a context menu with the
following options:
* **Configure** - modify this *function environment*
On the **Configure Function Environment** pop-up:
* In the text input, enter one or more names & versions of packages to install
and click **Install Package(s)** to install them
* Click the delete icon to the right of any non-default package to uninstall
* **Delete** - delete this *context*
* **Multi-Select** - turn on multi-select mode, which allows
multiple objects to be selected (by checking the boxes in front of them) and
then deleted by clicking **Delete Selected**; click
**Cancel** to turn off multi-select mode