> ## Documentation Index
> Fetch the complete documentation index at: https://docs.kinetica.com/llms.txt
> Use this file to discover all available pages before exploring further.
# Reveal SDK
## Introduction
[Reveal](/content/bi/reveal) is a web-based visual data exploration and insight
discovery tool. It allows users who may or may not have extensive experience
with big data or data analytics to quickly build charts, graphs, and maps in a
meaningful way to explore their dataset. *Reveal* was designed to be interactive
and easy to use.
While *Reveal* comes included with many common [charts](/content/bi/reveal#reveal-charts) and
map [slices](/content/bi/reveal#reveal-slices) (collectively, what we call widgets in
*Reveal*), the *Reveal SDK* allows developers to create their own custom
*slice types*. From these, *slices* can be created, which can interact with
existing [dashboards](/content/bi/reveal#reveal-dashboards) and *slices*. The *Reveal*
architecture allows for complete control and customization of what is rendered
in the *slice*, as well as what interactions are available to users.
## Software Stack
*Reveal* is a web application with a *Python* (currently requires version
`3.10`) backend server and mostly *JavaScript*/*React* frontend client. It uses
*Flask AppBuilder* as its server-side web framework. The client-side code is
primarily a single page app design which leverages bundled *JavaScript* built
using *webpack* from a *Node* (requires version `6.9.0+`) project structure.
For database connections, *Reveal* uses *PyODBC* to query *Kinetica* via a
custom *SQLAlchemy* connector. Some [slices](/content/bi/reveal#reveal-slices) also interact
with *Kinetica* via API endpoints. It is recommended that, in addition to
basic knowledge of the endpoint API, a custom *slice type* developer have some
familiarity with the following technologies:
### React
This popular *JavaScript* library is the recommended way to build custom
[slice](/content/bi/reveal#reveal-slices) frontends, for its component design pattern.
### ECMAScript 2015 (or ES6)
A lot of the existing code and *slice types* are written in this specification
and the included *webpack* build process is already configured to transpile
using *Babel*.
### webpack
While all the necessary build steps are already configured for the developer, it
might help to have some understanding of how it works in case the build needs to
be customized.
### D3/NVD3
*D3* is a *JavaScript* library that makes it easy to manipulate the DOM based on
data, but it is commonly known as one of the most popular charting/visualization
libraries. *NVD3* builds on top of *D3* and abstracts away some of the
complexity of *D3* and makes it even easier to use.
### OpenLayers
This map visualization library is what we currently use for our *Map*
[slices](/content/bi/reveal#reveal-slices). It is very powerful and supports a lot of
industry standard features and customization.
## Architecture
The following diagram represents the general data architecture and flow of a
typical *Reveal* [dashboard](/content/bi/reveal#reveal-dashboards). We find that many use
cases integrate both *Map* and *Filter* [slices](/content/bi/reveal#reveal-slices). While
these particular *slices* are not required to build a *dashboard*, the
*Filter slice* is required to enable global/cross filtering in the *dashboard*.
This means any filtering interaction such as drawing an area selection on a map
or clicking on a bar in a *Histogram slice* will trigger a filtering of all data
represented in the *dashboard* by those parameters and a re-rendering of other
*slices* in the *dashboard*.
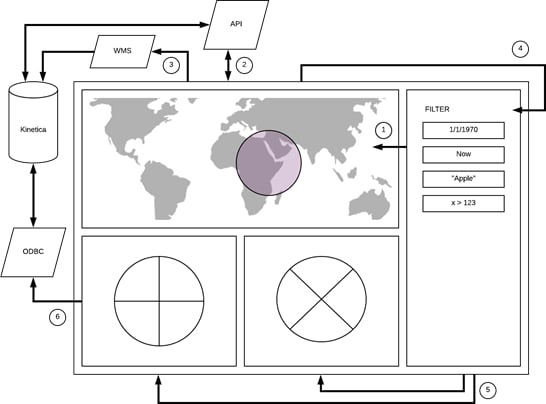 ### Data Flow Summary
1. The *Filter slice* sends current filter parameters to the map widget and
merges with any applied geospatial filters to form a new global data filter.
2. The *Map slice* calls various *JavaScript* API endpoints as needed depending
on the type of filter parameters and query chains them to reduce them to a
new dataset with all filters applied. The result returned is a GUID (a view
name) that represents this dataset.
3. The *Map slice* uses the new GUID to make a WMS request to generate a new
data overlay image which is then applied to the map.
4. The *Map slice* also sends the new GUID to the *Filter slice* for global
broadcast. Think of the *Filter slice* as a central data/filter dispatch. It
manages most of the pub/sub service channels used for *dashboard* data flow.
5. The *Filter slice* broadcasts the GUID to all other *slices* in the
*dashboard*.
6. All other *slices* uses the new GUID to load data from the database either
via SQL/ODBC or additional *JavaScript* API endpoint calls and then renders
their respective visualization.
If there is no *Map slice* included in the *dashboard* and only the
*Filter slice* is used, the *Filter slice* alone will manage all the
filtering and broadcast of the GUIDs.
### API/WMS Requests
While it is possible in a *slice* to call any *Kinetica* API or WMS endpoint
directly, it is a recommended best practice to use the proxies provided by the
*Reveal* web application framework. This allows and supports authenticated
request mode if authentication is enabled on the database. The server will
handle passing the current logged in user’s credentials with each request.
* **API Endpoint Proxy URL**: http\://\:8088/caravel/proxy
* **WMS Endpoint Proxy URL**: http\://\:8088/caravel/wms
## SDK Concepts
The *Reveal SDK* is a set of command line tools which allows and assists
developers in creating new custom [slice types](/content/bi/reveal#reveal-slices) for
*Reveal*. These tools will help with:
* **Creating** a new boilerplate template for new custom *slice types* for a
quick start
* **Watching** a custom *slice type* development codebase so any new changes
will be reflected in the local development *Reveal* app immediately
* **Extracting** a custom *slice type* into a portable package for migration to
another *Kinetica* installation; useful for deploying to production
* **Installing** a custom *slice type* package from another *Kinetica*
environment into a local development *Reveal* app
The default *Reveal SDK* home directory is
/opt/gpudb/connectors/reveal/sdk, and will be referenced throughout
the remainder of this guide.
*Reveal* is designed in such a way that all code and static resources for a
given *slice type* reside in their own folder. Each *slice type* folder is
located under the slices folder in the *Reveal SDK* home directory. A
*slice type* folder must contain at least four files:
* [Node Project File](#node-project-file) - package.json: defines some attributes of the
*slice type* and any required dependencies
* [Python Slice Class](#python-slice-class) - **init**.py: defines the server-side data
request and response handlers that will read data from the database
* [JavaScript Slice Renderer](#javascript-slice-renderer) - \.jsx: contains a plain
function that must return an object with a render function
* [Thumbnail Icon](#thumbnail-icon) - \.png: image that represents the icon
for the *slice type*
Additionally, the folder can also contain any external \*.css or
additional *React* \*.jsx component files required by the *slice*.
In the following sections, we’ll be using our **Kinetica Big Number**
*slice type* as an example. It is structured as follows, under the *Reveal SDK*
home directory:
* /slices
* /kinetica\_big\_number
* **init**.py
* kinetica\_big\_number.css
* kinetica\_big\_number.jsx
* kinetica\_big\_number.png
* package.json
### Node Project File
The package.json *Node* project file will define some required
attributes which will allow *Reveal* to detect and build the *slice type*. In
this file you can also define any additional required NPM dependencies used by
the *slice type*.
For example:
```json theme={null}
{
"name": "kinetica_big_number",
"version": "1.0.0",
"description": "Big Number slice.",
"main": "kinetica_big_number.jsx",
"author": "Kinetica",
"license": "ISC",
"dependencies": {
"argparse": "1.0.10",
"glob": "7.1.2"
}
}
```
### Python Slice Class
The **init**.py *Python* class must extend the `BaseViz` class, which
implements all the required methods to handle database queries and return the
data back to the client. There are several other methods involved, but we’ll
cover just two primary ones that are most often extended:
* `query_obj()` - responsible for defining the structure of the data query
request such as specifying group-bys, columns, and metrics
* `get_data()` - responsible for transforming the results from the database
query request into a consumable JSON format for the client *slice* component
to consume
#### Fieldsets
Another important *Python* class configuration is the `fieldsets` parameter.
It defines which field(s) will be exposed for *slice* customization in the
[slice editor](/content/bi/reveal#reveal-slices) screen in *Reveal*. All currently provided
fields are defined in the `FormFactory` class in a file named forms.py
in the *Reveal SDK* home directory.
Some commonly-used fields include:
* `metrics` - a multi-select field with a list of all available metrics for a
given table
* `metric` - a select field with a list of all available metrics for a given
table
* `groupby` - a multi-select field with a list of all groupable columns for a
given table
* `all_columns` - a multi-select field with a list of all available columns
for a given table
* `limit` - a free-form select field with a list of suggestions of
`0`, `5`, `10`, `25`, `50`, `100`, and `500`
The `Time` fieldset is always included for every *slice* by default.
#### Custom Fields
Several form field types are available to use from the wtforms library.
However, custom *slice type* development will likely require developers to
define their own form field controls in order to configure their *slice type*.
New controls can be defined in the **init**.py file. Simply provide a
configuration map parameter called `form_custom` in the *Python* class, which
will contain the definition of any custom fields.
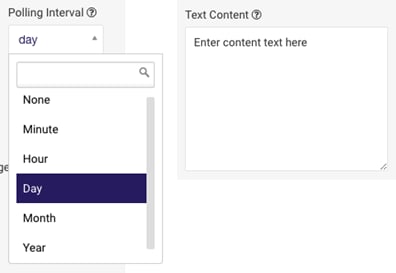
The following example defines two custom fields called
**Polling Interval** & **Text Content**. Using these, two
fieldsets will be created. The first fieldset will contain the default
`metric` field and the **Polling Interval** custom field. The second
fieldset will contain the **Text Content** field.
```python theme={null}
from wtforms import (
SelectMultipleField, SelectField, TextField, TextAreaField,
BooleanField, IntegerField, HiddenField, DecimalField)
class CustomFieldExampleViz(BaseViz):
# Below is a simple example of how to implement custom form fields for a
# custom slice.
# For this custom slice we will create two custom fields: interval &
# content. Two fieldsets will be created: Group A will contain the default
# metric field and the custom interval field, and Group B will contain the
# custom content field only. These fields will be defined further below in
# form_custom.
fieldsets = ({
'label': _('Group A'),
'fields': (
'metric',
'interval',
)
},{
'label': _('Group B'),
'fields': (
'content',
)
},)
# Define your custom form controls in the form_custom map. The name
# of the key must match the value used above in fieldsets.
# The first param is the form field type. They are imported from
# wtforms lib and you can see what is available in the above imports.
# The second param is the configuration. The following fields can be
# specified, but not all may be required:
# * label - displayed above the form control on screen
# * default - the default value to select
# * choices - a tuple of label/value pairs for list controls
# * description - displayed in mouseover of info icon next to label
# Interval field will be a dropdown list which will display various
# time interval options such as Minute, Hour, Day, etc. It will be
# labeled 'Polling Interval' and its default selection will be Day.
# Content field will be a textfield which will allow users to enter
# any value. It will be labeled 'Text Content' and the default value
# will be 'Enter content text here'.
form_custom = {
'interval': (SelectField, {
"label": _("Polling Interval"),
"default": "day",
"choices": (
('none', _('None')),
('minute', _('Minute')),
('hour', _('Hour')),
('day', _('Day')),
('month', _('Month')),
('year', _('Year')),
),
"description": _("Interval for time data")
}),
'content': (TextField, {
"label": _("Text Content"),
"default": "Enter content text here",
"description": _("Content for page")
})
}
```
The two custom fields will appear on-screen like this:
### Data Flow Summary
1. The *Filter slice* sends current filter parameters to the map widget and
merges with any applied geospatial filters to form a new global data filter.
2. The *Map slice* calls various *JavaScript* API endpoints as needed depending
on the type of filter parameters and query chains them to reduce them to a
new dataset with all filters applied. The result returned is a GUID (a view
name) that represents this dataset.
3. The *Map slice* uses the new GUID to make a WMS request to generate a new
data overlay image which is then applied to the map.
4. The *Map slice* also sends the new GUID to the *Filter slice* for global
broadcast. Think of the *Filter slice* as a central data/filter dispatch. It
manages most of the pub/sub service channels used for *dashboard* data flow.
5. The *Filter slice* broadcasts the GUID to all other *slices* in the
*dashboard*.
6. All other *slices* uses the new GUID to load data from the database either
via SQL/ODBC or additional *JavaScript* API endpoint calls and then renders
their respective visualization.
If there is no *Map slice* included in the *dashboard* and only the
*Filter slice* is used, the *Filter slice* alone will manage all the
filtering and broadcast of the GUIDs.
### API/WMS Requests
While it is possible in a *slice* to call any *Kinetica* API or WMS endpoint
directly, it is a recommended best practice to use the proxies provided by the
*Reveal* web application framework. This allows and supports authenticated
request mode if authentication is enabled on the database. The server will
handle passing the current logged in user’s credentials with each request.
* **API Endpoint Proxy URL**: http\://\:8088/caravel/proxy
* **WMS Endpoint Proxy URL**: http\://\:8088/caravel/wms
## SDK Concepts
The *Reveal SDK* is a set of command line tools which allows and assists
developers in creating new custom [slice types](/content/bi/reveal#reveal-slices) for
*Reveal*. These tools will help with:
* **Creating** a new boilerplate template for new custom *slice types* for a
quick start
* **Watching** a custom *slice type* development codebase so any new changes
will be reflected in the local development *Reveal* app immediately
* **Extracting** a custom *slice type* into a portable package for migration to
another *Kinetica* installation; useful for deploying to production
* **Installing** a custom *slice type* package from another *Kinetica*
environment into a local development *Reveal* app
The default *Reveal SDK* home directory is
/opt/gpudb/connectors/reveal/sdk, and will be referenced throughout
the remainder of this guide.
*Reveal* is designed in such a way that all code and static resources for a
given *slice type* reside in their own folder. Each *slice type* folder is
located under the slices folder in the *Reveal SDK* home directory. A
*slice type* folder must contain at least four files:
* [Node Project File](#node-project-file) - package.json: defines some attributes of the
*slice type* and any required dependencies
* [Python Slice Class](#python-slice-class) - **init**.py: defines the server-side data
request and response handlers that will read data from the database
* [JavaScript Slice Renderer](#javascript-slice-renderer) - \.jsx: contains a plain
function that must return an object with a render function
* [Thumbnail Icon](#thumbnail-icon) - \.png: image that represents the icon
for the *slice type*
Additionally, the folder can also contain any external \*.css or
additional *React* \*.jsx component files required by the *slice*.
In the following sections, we’ll be using our **Kinetica Big Number**
*slice type* as an example. It is structured as follows, under the *Reveal SDK*
home directory:
* /slices
* /kinetica\_big\_number
* **init**.py
* kinetica\_big\_number.css
* kinetica\_big\_number.jsx
* kinetica\_big\_number.png
* package.json
### Node Project File
The package.json *Node* project file will define some required
attributes which will allow *Reveal* to detect and build the *slice type*. In
this file you can also define any additional required NPM dependencies used by
the *slice type*.
For example:
```json theme={null}
{
"name": "kinetica_big_number",
"version": "1.0.0",
"description": "Big Number slice.",
"main": "kinetica_big_number.jsx",
"author": "Kinetica",
"license": "ISC",
"dependencies": {
"argparse": "1.0.10",
"glob": "7.1.2"
}
}
```
### Python Slice Class
The **init**.py *Python* class must extend the `BaseViz` class, which
implements all the required methods to handle database queries and return the
data back to the client. There are several other methods involved, but we’ll
cover just two primary ones that are most often extended:
* `query_obj()` - responsible for defining the structure of the data query
request such as specifying group-bys, columns, and metrics
* `get_data()` - responsible for transforming the results from the database
query request into a consumable JSON format for the client *slice* component
to consume
#### Fieldsets
Another important *Python* class configuration is the `fieldsets` parameter.
It defines which field(s) will be exposed for *slice* customization in the
[slice editor](/content/bi/reveal#reveal-slices) screen in *Reveal*. All currently provided
fields are defined in the `FormFactory` class in a file named forms.py
in the *Reveal SDK* home directory.
Some commonly-used fields include:
* `metrics` - a multi-select field with a list of all available metrics for a
given table
* `metric` - a select field with a list of all available metrics for a given
table
* `groupby` - a multi-select field with a list of all groupable columns for a
given table
* `all_columns` - a multi-select field with a list of all available columns
for a given table
* `limit` - a free-form select field with a list of suggestions of
`0`, `5`, `10`, `25`, `50`, `100`, and `500`
The `Time` fieldset is always included for every *slice* by default.
#### Custom Fields
Several form field types are available to use from the wtforms library.
However, custom *slice type* development will likely require developers to
define their own form field controls in order to configure their *slice type*.
New controls can be defined in the **init**.py file. Simply provide a
configuration map parameter called `form_custom` in the *Python* class, which
will contain the definition of any custom fields.
The following example defines two custom fields called
**Polling Interval** & **Text Content**. Using these, two
fieldsets will be created. The first fieldset will contain the default
`metric` field and the **Polling Interval** custom field. The second
fieldset will contain the **Text Content** field.
```python theme={null}
from wtforms import (
SelectMultipleField, SelectField, TextField, TextAreaField,
BooleanField, IntegerField, HiddenField, DecimalField)
class CustomFieldExampleViz(BaseViz):
# Below is a simple example of how to implement custom form fields for a
# custom slice.
# For this custom slice we will create two custom fields: interval &
# content. Two fieldsets will be created: Group A will contain the default
# metric field and the custom interval field, and Group B will contain the
# custom content field only. These fields will be defined further below in
# form_custom.
fieldsets = ({
'label': _('Group A'),
'fields': (
'metric',
'interval',
)
},{
'label': _('Group B'),
'fields': (
'content',
)
},)
# Define your custom form controls in the form_custom map. The name
# of the key must match the value used above in fieldsets.
# The first param is the form field type. They are imported from
# wtforms lib and you can see what is available in the above imports.
# The second param is the configuration. The following fields can be
# specified, but not all may be required:
# * label - displayed above the form control on screen
# * default - the default value to select
# * choices - a tuple of label/value pairs for list controls
# * description - displayed in mouseover of info icon next to label
# Interval field will be a dropdown list which will display various
# time interval options such as Minute, Hour, Day, etc. It will be
# labeled 'Polling Interval' and its default selection will be Day.
# Content field will be a textfield which will allow users to enter
# any value. It will be labeled 'Text Content' and the default value
# will be 'Enter content text here'.
form_custom = {
'interval': (SelectField, {
"label": _("Polling Interval"),
"default": "day",
"choices": (
('none', _('None')),
('minute', _('Minute')),
('hour', _('Hour')),
('day', _('Day')),
('month', _('Month')),
('year', _('Year')),
),
"description": _("Interval for time data")
}),
'content': (TextField, {
"label": _("Text Content"),
"default": "Enter content text here",
"description": _("Content for page")
})
}
```
The two custom fields will appear on-screen like this:
 The **Kinetica Big Number** *slice type* fieldset looks like this:
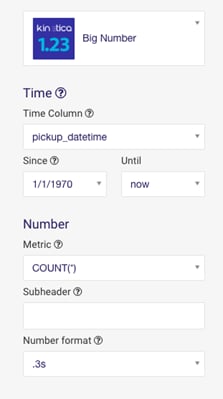 The following is the **init**.py for the example **Kinetica Big Number**
*slice type* fieldset above:
```python theme={null}
from caravel.baseviz import BaseViz
from flask_babel import lazy_gettext as _
class KineticaBigNumberViz(BaseViz):
"""Put emphasis on a single metric with this big number viz"""
viz_type = "kinetica_big_number"
verbose_name = _("Big Number")
is_timeseries = False
# Form field configuration for the slice.
fieldsets = ({
'label': _('Number'),
'fields': (
'metric',
'subheader',
'y_axis_format',
)
},)
# You can override form field default labels but specifying
# custom values in the form_overrides map. The following will
# display the y_axis_format text field with the label
# 'Number format'.
form_overrides = {
'y_axis_format': {
'label': _('Number format'),
}
}
```
```python theme={null}
# The query_obj method allows you to customize the data
# request SQL query, often passing form field values entered
# from the slice configuration. In the example below, the slice
# is going to use the metric selected from the UI and using it
# as the metrics parameter for the query. An example metric
# would be COUNT(*). This slice also requires the user to
# select a metric to continue.
def query_obj(self):
d = super(KineticaBigNumberViz, self).query_obj()
metric = self.form_data.get('metric')
if not metric:
raise Exception("Pick a metric!")
d['metrics'] = [self.form_data.get('metric')]
self.form_data['metric'] = metric
return d
# The get_data method allows user to take results from the
# data request SQL query and shape it into any desired JSON
# format for the client to use in rendering the slice. In this
# case, an object with property 'data' which contains the
# metric result and 'subheader', the label the user entered
# in the subheader text field in the slice configuration screen.
def get_data(self):
form_data = self.form_data
df = self.get_df()
df.sort_values(by=df.columns[0], inplace=True)
return {
'data': df.values.tolist(),
'subheader': form_data.get('subheader', ''),
}
def getclass():
return KineticaBigNumberViz
```
### JavaScript Slice Renderer
The \*.js/\*.jsx *JavaScript* module must export a function that returns
an object with a `render` and a `resize` function as properties. These
functions are called by the *dashboard* or *slice* editor screens to render the
*slice* when needed. The `render` function is responsible for managing
everything required for the *slice* including, but not exclusive to,
resetting/clearing the *slice*, fetching data from ODBC/API, manipulating the
DOM to draw the desired visualization, and also handling user events for
interactive *slices*.
#### Libraries and Modules
Bundled utilities and other functions can be imported using the kReveal/
prefix. These include utilities for publishing and subscribing to message
channels, as well as color-picking helpers. The kReveal prefix is
actually an alias for
/opt/gpudb/connectors/reveal/lib/python2.7/site-packages/caravel-0.11.0-py2.7.egg/caravel/static/assets/,
so any *JavaScript* files in that directory would be available. An example
import would be:
```js theme={null}
import KineticaTheme from 'kReveal/utils/kineticaTheme';
```
Any *node* modules that are installed locally to the *slice* must be imported
using the relative path to the module. This is because all the packages are
only searched for in *Reveal’s* node\_modules folder if a relative or
absolute path is not used. For example:
```js theme={null}
// This will NOT work!
import bluebird from 'bluebird';
// This will work.
import bluebird from './node_modules/bluebird';
```
The code below has been simplified for demonstration. The full source
is available in the slices folder in the SDK Home directory.
```javascript theme={null}
// Import any needed modules
import "./kinetica_big_number.css";
// Main slice function
function kineticaBigNumber(slice) {
// Handle to the slice DOM node for manipulation
const div = d3.select(slice.selector);
// Render method called by dashboard when rendering slice
let render = kineticaData => {
let endpoint = slice.jsonEndpoint({ extraFilters: true });
// Check if data sent from global filter slice
if (kineticaData) {
// Get filtered table name
const tableName = kineticaData.k_table_name
? kineticaData.k_table_name
: null;
// Only use view name from same source table
const primaryTable = getParamFromQryStr(endpoint, "datasource_name");
if (tableName && tableName.startsWith(primaryTable)) {
// Use the new filtered table for data queries
endpoint = updateQryStrParam(
endpoint,
"datasource_name",
encodeURIComponent(tableName)
);
}
}
// This is the call to fetch data
KineticaData.jsonCache(
endpoint,
loading,
(error, payload, cached = false) => {
// Clear the slice
div.selectAll("*").remove();
const fd = payload.form_data;
const json = payload.data;
///////////////////////////////////////////////////////
// START - CUSTOM SLICE CODE TO RENDER VISUALIZATION //
///////////////////////////////////////////////////////
// Get data from response
const data = json.data;
const v = data[0][0];
const g = svg.append("g");
// Printing big number
g.append("g").append("text").text(f(v));
// Printing big number subheader text
if (json.subheader !== null && json.subheader !== "") {
g.append("text").text(json.subheader);
}
/////////////////////////////////////////////////////
// END - CUSTOM SLICE CODE TO RENDER VISUALIZATION //
/////////////////////////////////////////////////////
if (!cached) {
slice.done(payload);
}
}
);
};
// Throttle rendering of slices to prevent too many
// renderings triggered by resizing of window
render = debounce(render, config.kinetica.render.delay);
// Subscribe to pubsub to listen for new filtered table
// data for which we will re-render the slice
KineticaPubSub.subscribe(
"kinetica_big_number",
TBL + kPBConsts.FILTER,
(msg, data) => {
switch (msg) {
case TBL + kPBConsts.FILTER_TERMS: {
render(data);
break;
}
case TBL + kPBConsts.FILTER_TERMS_NOMAP: {
render(data);
break;
}
default: {
break;
}
}
}
);
return {
render: render,
resize: render
};
}
module.exports = kineticaBigNumber;
```
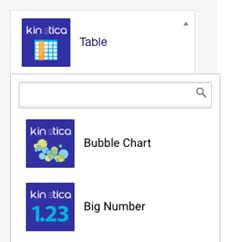
### Thumbnail Icon
The thumbnail icon is required to display the *slice type* as a dropdown option
in the *slice* editor where users can select the *slice type*. It is recommended
that the PNG image be `600` x `600` pixels, square, and have the same name
as the *slice type*: \.png.
The following is the **init**.py for the example **Kinetica Big Number**
*slice type* fieldset above:
```python theme={null}
from caravel.baseviz import BaseViz
from flask_babel import lazy_gettext as _
class KineticaBigNumberViz(BaseViz):
"""Put emphasis on a single metric with this big number viz"""
viz_type = "kinetica_big_number"
verbose_name = _("Big Number")
is_timeseries = False
# Form field configuration for the slice.
fieldsets = ({
'label': _('Number'),
'fields': (
'metric',
'subheader',
'y_axis_format',
)
},)
# You can override form field default labels but specifying
# custom values in the form_overrides map. The following will
# display the y_axis_format text field with the label
# 'Number format'.
form_overrides = {
'y_axis_format': {
'label': _('Number format'),
}
}
```
```python theme={null}
# The query_obj method allows you to customize the data
# request SQL query, often passing form field values entered
# from the slice configuration. In the example below, the slice
# is going to use the metric selected from the UI and using it
# as the metrics parameter for the query. An example metric
# would be COUNT(*). This slice also requires the user to
# select a metric to continue.
def query_obj(self):
d = super(KineticaBigNumberViz, self).query_obj()
metric = self.form_data.get('metric')
if not metric:
raise Exception("Pick a metric!")
d['metrics'] = [self.form_data.get('metric')]
self.form_data['metric'] = metric
return d
# The get_data method allows user to take results from the
# data request SQL query and shape it into any desired JSON
# format for the client to use in rendering the slice. In this
# case, an object with property 'data' which contains the
# metric result and 'subheader', the label the user entered
# in the subheader text field in the slice configuration screen.
def get_data(self):
form_data = self.form_data
df = self.get_df()
df.sort_values(by=df.columns[0], inplace=True)
return {
'data': df.values.tolist(),
'subheader': form_data.get('subheader', ''),
}
def getclass():
return KineticaBigNumberViz
```
### JavaScript Slice Renderer
The \*.js/\*.jsx *JavaScript* module must export a function that returns
an object with a `render` and a `resize` function as properties. These
functions are called by the *dashboard* or *slice* editor screens to render the
*slice* when needed. The `render` function is responsible for managing
everything required for the *slice* including, but not exclusive to,
resetting/clearing the *slice*, fetching data from ODBC/API, manipulating the
DOM to draw the desired visualization, and also handling user events for
interactive *slices*.
#### Libraries and Modules
Bundled utilities and other functions can be imported using the kReveal/
prefix. These include utilities for publishing and subscribing to message
channels, as well as color-picking helpers. The kReveal prefix is
actually an alias for
/opt/gpudb/connectors/reveal/lib/python2.7/site-packages/caravel-0.11.0-py2.7.egg/caravel/static/assets/,
so any *JavaScript* files in that directory would be available. An example
import would be:
```js theme={null}
import KineticaTheme from 'kReveal/utils/kineticaTheme';
```
Any *node* modules that are installed locally to the *slice* must be imported
using the relative path to the module. This is because all the packages are
only searched for in *Reveal’s* node\_modules folder if a relative or
absolute path is not used. For example:
```js theme={null}
// This will NOT work!
import bluebird from 'bluebird';
// This will work.
import bluebird from './node_modules/bluebird';
```
The code below has been simplified for demonstration. The full source
is available in the slices folder in the SDK Home directory.
```javascript theme={null}
// Import any needed modules
import "./kinetica_big_number.css";
// Main slice function
function kineticaBigNumber(slice) {
// Handle to the slice DOM node for manipulation
const div = d3.select(slice.selector);
// Render method called by dashboard when rendering slice
let render = kineticaData => {
let endpoint = slice.jsonEndpoint({ extraFilters: true });
// Check if data sent from global filter slice
if (kineticaData) {
// Get filtered table name
const tableName = kineticaData.k_table_name
? kineticaData.k_table_name
: null;
// Only use view name from same source table
const primaryTable = getParamFromQryStr(endpoint, "datasource_name");
if (tableName && tableName.startsWith(primaryTable)) {
// Use the new filtered table for data queries
endpoint = updateQryStrParam(
endpoint,
"datasource_name",
encodeURIComponent(tableName)
);
}
}
// This is the call to fetch data
KineticaData.jsonCache(
endpoint,
loading,
(error, payload, cached = false) => {
// Clear the slice
div.selectAll("*").remove();
const fd = payload.form_data;
const json = payload.data;
///////////////////////////////////////////////////////
// START - CUSTOM SLICE CODE TO RENDER VISUALIZATION //
///////////////////////////////////////////////////////
// Get data from response
const data = json.data;
const v = data[0][0];
const g = svg.append("g");
// Printing big number
g.append("g").append("text").text(f(v));
// Printing big number subheader text
if (json.subheader !== null && json.subheader !== "") {
g.append("text").text(json.subheader);
}
/////////////////////////////////////////////////////
// END - CUSTOM SLICE CODE TO RENDER VISUALIZATION //
/////////////////////////////////////////////////////
if (!cached) {
slice.done(payload);
}
}
);
};
// Throttle rendering of slices to prevent too many
// renderings triggered by resizing of window
render = debounce(render, config.kinetica.render.delay);
// Subscribe to pubsub to listen for new filtered table
// data for which we will re-render the slice
KineticaPubSub.subscribe(
"kinetica_big_number",
TBL + kPBConsts.FILTER,
(msg, data) => {
switch (msg) {
case TBL + kPBConsts.FILTER_TERMS: {
render(data);
break;
}
case TBL + kPBConsts.FILTER_TERMS_NOMAP: {
render(data);
break;
}
default: {
break;
}
}
}
);
return {
render: render,
resize: render
};
}
module.exports = kineticaBigNumber;
```
### Thumbnail Icon
The thumbnail icon is required to display the *slice type* as a dropdown option
in the *slice* editor where users can select the *slice type*. It is recommended
that the PNG image be `600` x `600` pixels, square, and have the same name
as the *slice type*: \.png.
 ### Cascading Style Sheets
The \*.css file(s) can include any style definitions required by the
*slice*. It is recommended to use the *slice type* class name in the CSS
selector to limit the scope of the style so it does not conflict with any other
*slices*.
The code below has been simplified for demonstration. The full source
is available in the slices folder in the SDK Home directory.
```css theme={null}
.kinetica_big_number .slice_container {
overflow: hidden !important;
}
.kinetica_big_number g.axis text,
.kinetica_big_number_total g.axis text {
font-size: 10px;
font-weight: normal;
color: gray;
fill: gray;
text-anchor: middle;
alignment-baseline: middle;
font-weight: none;
}
```
## Setup/Installation
The setup sequence must be run on both **development** and **deployment**
environments, so that the tools for managing custom *Reveal* components are
available for use.
Running any *npm* or SDK command requires `root` or
`gpudb` user permissions.
Reveal SDK development requires an internet connection. If there
are firewall rules enabled for `git` (native `git` transport uses TCP
port 9418), run the following before attempting to install any NPM packages:
```
git config --global url."https://".insteadOf git://
```
1. Install *Kinetica* database and make sure the service is up and running.
Refer to [Kinetica Installation](/content/install).
2. Install *git*. See [Git Downloads](https://git-scm.com/downloads) for
details.
3. Reveal is packaged with *Node* & *npm*, located in
/opt/gpudb/connectors/reveal/bin. This directory should be added to
the system path for development:
```bash theme={null}
# This only sets the path for the current session
export PATH=/opt/gpudb/connectors/reveal/bin:$PATH
```
4. Install the *Reveal SDK*:
```bash theme={null}
npm install -g /opt/gpudb/connectors/reveal/sdk
```
## Development Workflow
1. For development, it is recommended to have a dedicated directory for all
working custom *slice types*. This directory should be version-controlled as
it will contain the *slice type* configuration & script files. The structure
should mirror this:
* /\
* /\
* /\
* /\
2. Use the reveal-sdk script from the SDK to run the
slice-create command:
```
reveal-sdk slice-create
```
This will perform the following actions:
* Prompt the user for basic *slice type*-specific information to create the
package.json file
* What is the slice name?
Name must begin with alphabetic/underscore character and be
followed by zero or more alphanumeric/underscore characters
* Who is the author?
* What is the display name?
This is the name/label that will be displayed in the
*slice type* dropdown in the GUI
* What is the *slice* description?
* Use the included SDK *slice type* template files to generate a new custom
*slice type* directory based on the information provided in the previous
step
* Put the new *slice type* directory/files into the target development
directory
3. Use the reveal-sdk script from the SDK to run the
slice-watch command in a separate shell session:
```
reveal-sdk slice-watch /
```
This will perform the following actions:
* Run a full rebuild of all the *slice types* including the newly created
*slice type*
* Restart *Reveal* to activate the new *slice type*
* Start watching for changes to the specified *slice type* in the target
development directory and rebuild/restart when necessary
This is a continuous process so it should be run in a separate
shell. The command takes some time to run, as it installs *node* modules
and bundles all the *JavaScript* code.
4. Develop the custom *slice type* by modifying its files in the target
development directory. The *slice type* watch process will continually update
the *Reveal* application instance to reflect your changes. Test and repeat
process.
During iterative development, it may be necessary to do a hard
reload (clear asset cache) in your browser to make sure it downloads the
latest updated assets from the server.
When installing and using custom *npm* packages in custom
*slice types*, the import path must reference the *slice type* project’s
node\_modules directory directly:
```bash theme={null}
import $ from './node_modules/jquery';
```
## Deployment Workflow
1. In the **development** environment, where the *slice type* was created, use
the reveal-slice-extract script in the SDK Home directory to
extract the desired *slice type* code for migration to a production
environment. This command will compress the contents of the specified custom
*slice type* into a tarball.
```bash theme={null}
reveal-slice-extract []
```
By default, this will create a \.tar.gz file
with the packaged *slice type* in the current directory. Optionally, a
name for the tarball can be specified in the command.
2. Transfer the newly-created *slice type* package to the production server or
hosted repository.
3. Ensure that the *Reveal SDK* is installed on the target production server.
See [Reveal Setup/Installation](/content/bi/reveal/sdk#reveal-sdk-setup) for details.
4. In the **production** environment, where the *slice type* is to be deployed,
use the reveal-slice-install script in the SDK Home directory to
install the *slice type* package. This will extract the package into the
*Reveal* installation source slices folder and re-run the production
build. This will also restart *Reveal* to activate the new *slice type*.
If *Kinetica* is installed in a non-standard location, set the
`KINETICA_INSTALLED_PATH` to the top-level *Kinetica* directory
before running either reveal-slice-install or
reveal-slice-extract.
Currently *Kinetica* upgrades will overwrite your *slices*. Make
sure you save and archive all your custom *slice type* export tar files as
you MUST reapply them after each upgrade.
To deploy the *slice type* package, run:
```bash theme={null}
reveal-slice-install
```
This process may take several minutes, due to *node* modules
being installed and *webpack* needing to bundle all the *JavaScript*
files.
## White Labeling
It is possible to white label *Reveal* by customizing the logo and stylesheets.
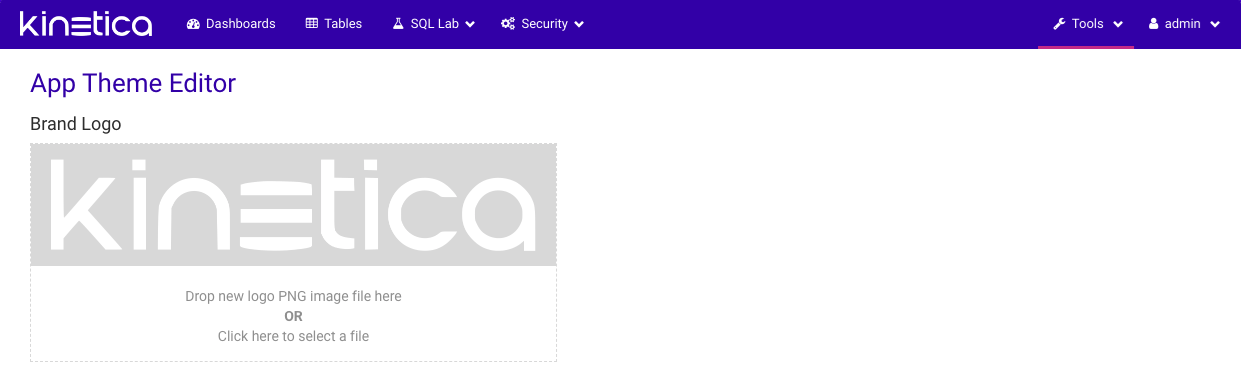
### Brand Logo
1. Create logo image PNG file.
Any image used as a logo will be scaled proportionally to fit into a height
of `25` pixels. The top navigation menu will be left-aligned to the end of
the scaled image, so the wider an image is, the further right the top menu
will begin. The default image is `133` x `25`, which can be used as a
guide when creating a custom logo.
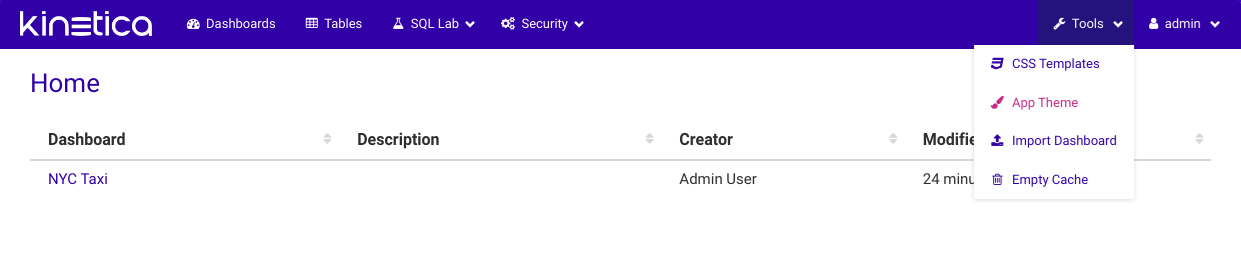
2. Navigate to *Reveal's* **Theme Editor** page:
1. Log into *Reveal*
2. Click **Tools**
3. Click **Theme**
### Cascading Style Sheets
The \*.css file(s) can include any style definitions required by the
*slice*. It is recommended to use the *slice type* class name in the CSS
selector to limit the scope of the style so it does not conflict with any other
*slices*.
The code below has been simplified for demonstration. The full source
is available in the slices folder in the SDK Home directory.
```css theme={null}
.kinetica_big_number .slice_container {
overflow: hidden !important;
}
.kinetica_big_number g.axis text,
.kinetica_big_number_total g.axis text {
font-size: 10px;
font-weight: normal;
color: gray;
fill: gray;
text-anchor: middle;
alignment-baseline: middle;
font-weight: none;
}
```
## Setup/Installation
The setup sequence must be run on both **development** and **deployment**
environments, so that the tools for managing custom *Reveal* components are
available for use.
Running any *npm* or SDK command requires `root` or
`gpudb` user permissions.
Reveal SDK development requires an internet connection. If there
are firewall rules enabled for `git` (native `git` transport uses TCP
port 9418), run the following before attempting to install any NPM packages:
```
git config --global url."https://".insteadOf git://
```
1. Install *Kinetica* database and make sure the service is up and running.
Refer to [Kinetica Installation](/content/install).
2. Install *git*. See [Git Downloads](https://git-scm.com/downloads) for
details.
3. Reveal is packaged with *Node* & *npm*, located in
/opt/gpudb/connectors/reveal/bin. This directory should be added to
the system path for development:
```bash theme={null}
# This only sets the path for the current session
export PATH=/opt/gpudb/connectors/reveal/bin:$PATH
```
4. Install the *Reveal SDK*:
```bash theme={null}
npm install -g /opt/gpudb/connectors/reveal/sdk
```
## Development Workflow
1. For development, it is recommended to have a dedicated directory for all
working custom *slice types*. This directory should be version-controlled as
it will contain the *slice type* configuration & script files. The structure
should mirror this:
* /\
* /\
* /\
* /\
2. Use the reveal-sdk script from the SDK to run the
slice-create command:
```
reveal-sdk slice-create
```
This will perform the following actions:
* Prompt the user for basic *slice type*-specific information to create the
package.json file
* What is the slice name?
Name must begin with alphabetic/underscore character and be
followed by zero or more alphanumeric/underscore characters
* Who is the author?
* What is the display name?
This is the name/label that will be displayed in the
*slice type* dropdown in the GUI
* What is the *slice* description?
* Use the included SDK *slice type* template files to generate a new custom
*slice type* directory based on the information provided in the previous
step
* Put the new *slice type* directory/files into the target development
directory
3. Use the reveal-sdk script from the SDK to run the
slice-watch command in a separate shell session:
```
reveal-sdk slice-watch /
```
This will perform the following actions:
* Run a full rebuild of all the *slice types* including the newly created
*slice type*
* Restart *Reveal* to activate the new *slice type*
* Start watching for changes to the specified *slice type* in the target
development directory and rebuild/restart when necessary
This is a continuous process so it should be run in a separate
shell. The command takes some time to run, as it installs *node* modules
and bundles all the *JavaScript* code.
4. Develop the custom *slice type* by modifying its files in the target
development directory. The *slice type* watch process will continually update
the *Reveal* application instance to reflect your changes. Test and repeat
process.
During iterative development, it may be necessary to do a hard
reload (clear asset cache) in your browser to make sure it downloads the
latest updated assets from the server.
When installing and using custom *npm* packages in custom
*slice types*, the import path must reference the *slice type* project’s
node\_modules directory directly:
```bash theme={null}
import $ from './node_modules/jquery';
```
## Deployment Workflow
1. In the **development** environment, where the *slice type* was created, use
the reveal-slice-extract script in the SDK Home directory to
extract the desired *slice type* code for migration to a production
environment. This command will compress the contents of the specified custom
*slice type* into a tarball.
```bash theme={null}
reveal-slice-extract []
```
By default, this will create a \.tar.gz file
with the packaged *slice type* in the current directory. Optionally, a
name for the tarball can be specified in the command.
2. Transfer the newly-created *slice type* package to the production server or
hosted repository.
3. Ensure that the *Reveal SDK* is installed on the target production server.
See [Reveal Setup/Installation](/content/bi/reveal/sdk#reveal-sdk-setup) for details.
4. In the **production** environment, where the *slice type* is to be deployed,
use the reveal-slice-install script in the SDK Home directory to
install the *slice type* package. This will extract the package into the
*Reveal* installation source slices folder and re-run the production
build. This will also restart *Reveal* to activate the new *slice type*.
If *Kinetica* is installed in a non-standard location, set the
`KINETICA_INSTALLED_PATH` to the top-level *Kinetica* directory
before running either reveal-slice-install or
reveal-slice-extract.
Currently *Kinetica* upgrades will overwrite your *slices*. Make
sure you save and archive all your custom *slice type* export tar files as
you MUST reapply them after each upgrade.
To deploy the *slice type* package, run:
```bash theme={null}
reveal-slice-install
```
This process may take several minutes, due to *node* modules
being installed and *webpack* needing to bundle all the *JavaScript*
files.
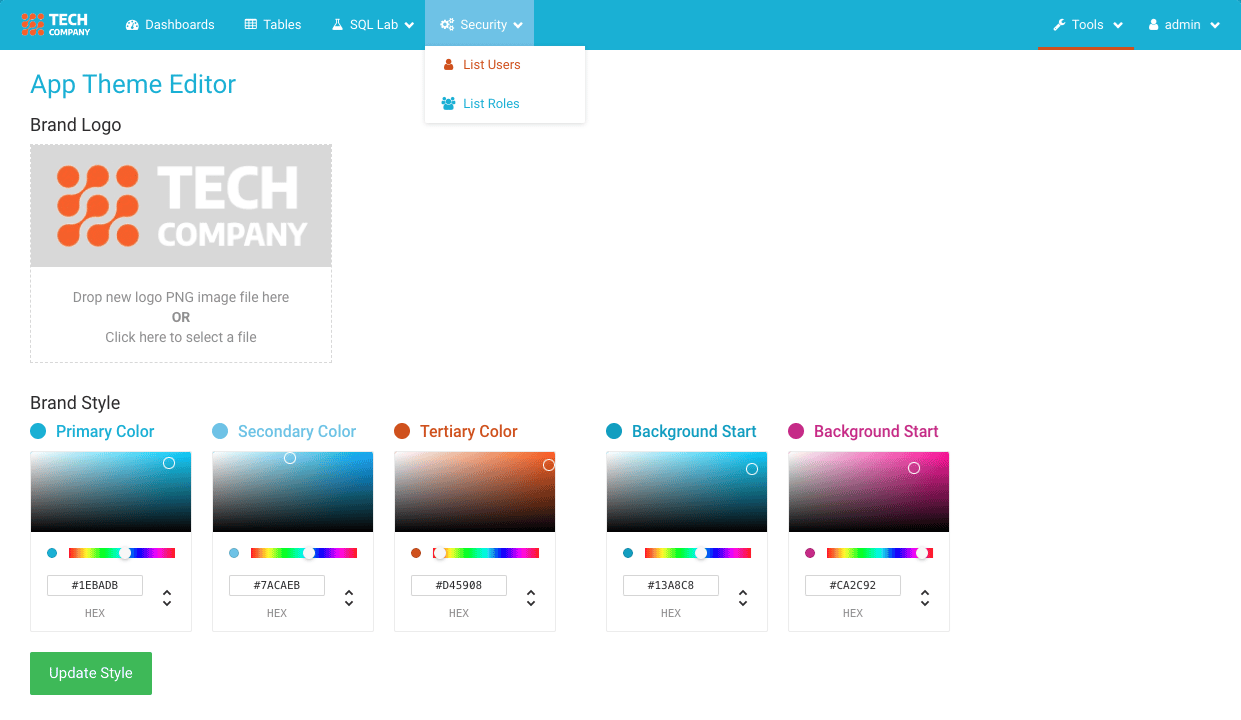
## White Labeling
It is possible to white label *Reveal* by customizing the logo and stylesheets.
### Brand Logo
1. Create logo image PNG file.
Any image used as a logo will be scaled proportionally to fit into a height
of `25` pixels. The top navigation menu will be left-aligned to the end of
the scaled image, so the wider an image is, the further right the top menu
will begin. The default image is `133` x `25`, which can be used as a
guide when creating a custom logo.
2. Navigate to *Reveal's* **Theme Editor** page:
1. Log into *Reveal*
2. Click **Tools**
3. Click **Theme**
 3. Install logo image.
Either drag and drop the new logo PNG file into the drop area OR click on the
drop area to select a file manually.
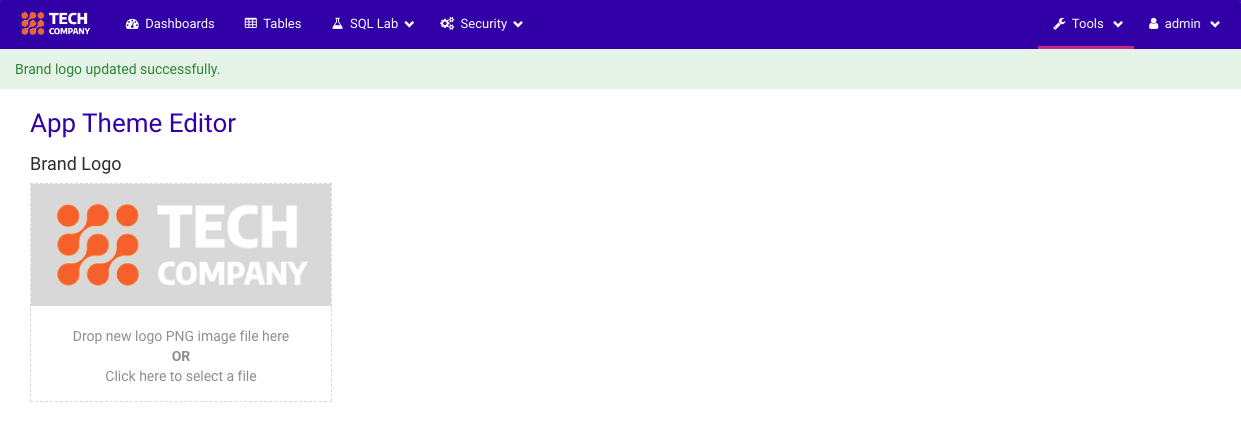
3. Install logo image.
Either drag and drop the new logo PNG file into the drop area OR click on the
drop area to select a file manually.
 The new logo will appear and be active as soon as it is uploaded.
 ### Brand Style
1. Navigate to *Reveal's* **Theme Editor** page:
1. Log into *Reveal*
2. Click **Tools**
3. Click **Theme**
2. Modify brand colors:
1. Under the **Brand Style** section, select the desired colors
### Brand Style
1. Navigate to *Reveal's* **Theme Editor** page:
1. Log into *Reveal*
2. Click **Tools**
3. Click **Theme**
2. Modify brand colors:
1. Under the **Brand Style** section, select the desired colors
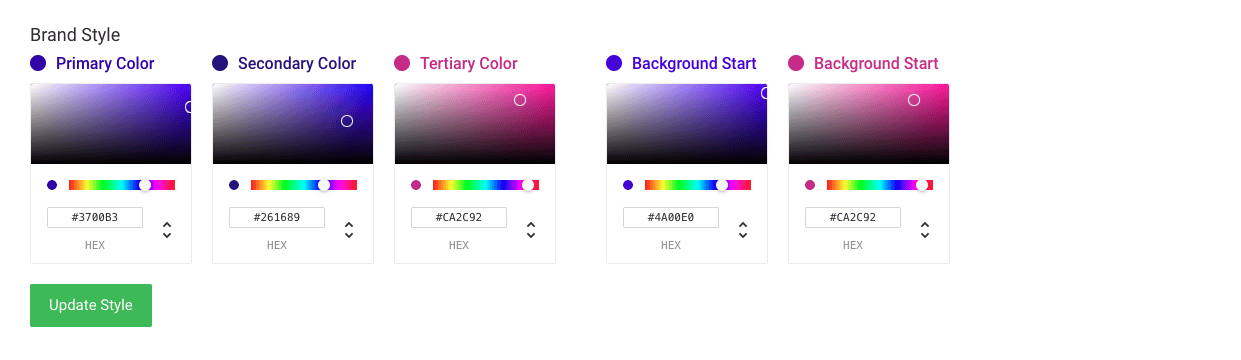 2. Click the **Update Style** button.
The changes will be active immediately.
2. Click the **Update Style** button.
The changes will be active immediately.
 ### Login Screen Title/Subtitle
The login screen title and subtitle can be customized by editing the *Reveal*
configuration file located at
/opt/gpudb/connectors/reveal/etc/config.py. This will require a
*Reveal* restart.
```bash theme={null}
# Configure login page title and subtitle
LOGIN_TITLE = 'Reveal'
LOGIN_SUBTITLE = 'Visual Data Exploration'
```
### Theme Backup
Create a compressed archive of your current theme, which includes both the color
scheme and brand logo.
```bash theme={null}
reveal-theme backup
```
This will create a TAR/GZIP file with the name and location given
in \.
### Theme Restore
Restore the theme from the backup compressed archive.
```bash theme={null}
reveal-theme restore
```
This process will take several minutes due to *node* modules being
installed and *webpack* needing to bundle all the CSS/Less files.
## Upgrades
Currently, when performing an upgrade of *Kinetica*, the existing instance of
*Reveal* will be replaced by a newer version. While the *Reveal* settings and
database where *dashboards* and *slices* are stored will be preserved, custom
*slice types* are not. To remedy this, the SDK provides a tool that will ensure
that custom *slice types* are backed up and can be reapplied after the upgrade.
If this is the first time using the SDK on the target deployment
environment, please follow the steps outlined in
[Reveal Setup/Installation](/content/bi/reveal/sdk#reveal-sdk-setup).
Before upgrading, use the reveal-backup script from the SDK to backup
custom *slice types*. If *Reveal* has been white-labeled, it will need to be
backed using the reveal-theme script. The following commands will
backup both the *slice types* as well as any white-labeling artifacts.
```bash theme={null}
reveal-backup
reveal-theme backup
```
This will create TAR/GZIP files with the names and locations
given in \ &
\. Make sure to use a different name
for each file to prevent one from overwriting the other.
Next, upgrade *Kinetica*. After the upgrade, use the reveal-restore
script from the SDK to restore custom *slice types* to the new *Reveal*
instance. If there are white-labeling backups, those can be restored as well
with the reveal-theme script.
```bash theme={null}
reveal-restore
reveal-theme restore
```
Login to *Reveal* application and verify your custom *slice types* and any
custom white-labeling.
## Extras
### Connect Reveal to External Kinetica Instance
While working on customizing *Reveal* in a local development environment, it is
possible to point *Reveal* to other *Kinetica* database instances for testing.
The following configuration files need to be updated:
* /opt/gpudb/connectors/reveal/etc/config.py
```bash theme={null}
GPUDB_PROXY_HOST = '127.0.0.1'
GPUDB_PROXY_PORT = '9191'
```
* /opt/gpudb/connectors/odbcserver/bin/gpudbodbc.ini
```bash theme={null}
URL=http://127.0.0.1:9191/
```
### Pub/Sub Data Communication
*Reveal* leverages a pub/sub system to allow *slices* within a *dashboard* to
send data back and forth to one another. To hook into this communication system,
import the `KineticaPubSub` *JavaScript* utility library and call from within
the main *slice* function. There are two primary methods:
* `publish()`
```js theme={null}
KineticaPubSub.publish('kinetica_big_number', CHANNEL_NAME, {});
```
* `subscribe()`
```js theme={null}
KineticaPubSub.subscribe('kinetica_big_number', CHANNEL_NAME, (msg, data) => {});
```
### Login Screen Title/Subtitle
The login screen title and subtitle can be customized by editing the *Reveal*
configuration file located at
/opt/gpudb/connectors/reveal/etc/config.py. This will require a
*Reveal* restart.
```bash theme={null}
# Configure login page title and subtitle
LOGIN_TITLE = 'Reveal'
LOGIN_SUBTITLE = 'Visual Data Exploration'
```
### Theme Backup
Create a compressed archive of your current theme, which includes both the color
scheme and brand logo.
```bash theme={null}
reveal-theme backup
```
This will create a TAR/GZIP file with the name and location given
in \.
### Theme Restore
Restore the theme from the backup compressed archive.
```bash theme={null}
reveal-theme restore
```
This process will take several minutes due to *node* modules being
installed and *webpack* needing to bundle all the CSS/Less files.
## Upgrades
Currently, when performing an upgrade of *Kinetica*, the existing instance of
*Reveal* will be replaced by a newer version. While the *Reveal* settings and
database where *dashboards* and *slices* are stored will be preserved, custom
*slice types* are not. To remedy this, the SDK provides a tool that will ensure
that custom *slice types* are backed up and can be reapplied after the upgrade.
If this is the first time using the SDK on the target deployment
environment, please follow the steps outlined in
[Reveal Setup/Installation](/content/bi/reveal/sdk#reveal-sdk-setup).
Before upgrading, use the reveal-backup script from the SDK to backup
custom *slice types*. If *Reveal* has been white-labeled, it will need to be
backed using the reveal-theme script. The following commands will
backup both the *slice types* as well as any white-labeling artifacts.
```bash theme={null}
reveal-backup
reveal-theme backup
```
This will create TAR/GZIP files with the names and locations
given in \ &
\. Make sure to use a different name
for each file to prevent one from overwriting the other.
Next, upgrade *Kinetica*. After the upgrade, use the reveal-restore
script from the SDK to restore custom *slice types* to the new *Reveal*
instance. If there are white-labeling backups, those can be restored as well
with the reveal-theme script.
```bash theme={null}
reveal-restore
reveal-theme restore
```
Login to *Reveal* application and verify your custom *slice types* and any
custom white-labeling.
## Extras
### Connect Reveal to External Kinetica Instance
While working on customizing *Reveal* in a local development environment, it is
possible to point *Reveal* to other *Kinetica* database instances for testing.
The following configuration files need to be updated:
* /opt/gpudb/connectors/reveal/etc/config.py
```bash theme={null}
GPUDB_PROXY_HOST = '127.0.0.1'
GPUDB_PROXY_PORT = '9191'
```
* /opt/gpudb/connectors/odbcserver/bin/gpudbodbc.ini
```bash theme={null}
URL=http://127.0.0.1:9191/
```
### Pub/Sub Data Communication
*Reveal* leverages a pub/sub system to allow *slices* within a *dashboard* to
send data back and forth to one another. To hook into this communication system,
import the `KineticaPubSub` *JavaScript* utility library and call from within
the main *slice* function. There are two primary methods:
* `publish()`
```js theme={null}
KineticaPubSub.publish('kinetica_big_number', CHANNEL_NAME, {});
```
* `subscribe()`
```js theme={null}
KineticaPubSub.subscribe('kinetica_big_number', CHANNEL_NAME, (msg, data) => {});
```