> ## Documentation Index
> Fetch the complete documentation index at: https://docs.kinetica.com/llms.txt
> Use this file to discover all available pages before exploring further.
# JupyterLab Tutorial
> Learn how to set up and use Jupyter Lab with Kinetica
## Introduction
JupyterLab is an integrated environment that can streamline the development of
Python code and Machine Learning (ML) models in Kinetica. Jupyter notebooks
integrate code execution, debugging, documentation, and visualization in a
single document for consumption by multiple audiences. With JupyterLab, Jupyter
notebooks can easily operate on a live Kinetica instance.
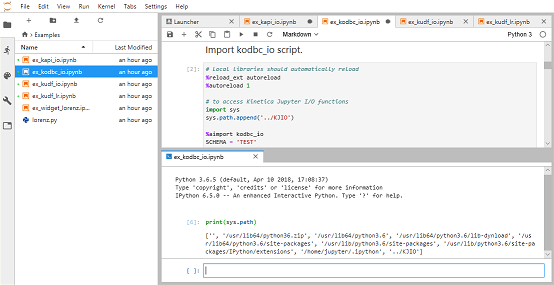 The development process is streamlined because sections of code (or cells) can
be run iteratively while updating results and graphs. JupyterLab can be accessed
from a web browser and supports a Python console with tab completions, tooltips,
and visual output.
One of the difficulties of using Jupyter notebooks with Kinetica in the past had
been that environments needed to be installed with all the necessary
dependencies. In this tutorial, the process will be simplified with a Docker
image that integrates the components, so they can run locally on any Intel-based
machine.
The Docker image integrates the following major components:
* JupyterLab
* Kinetica 6.2
* CentOS 7
* Python 3.6
The Python environment has the necessary modules for:
* Interaction with Kinetica using ODBC or the native API
* Creating and executing Kinetica UDF’s
* Execution of ML Models on Kinetica (e.g. Pandas, PyTorch, TensorFlow)
The Kinetica Intel build does not give GPU-accelerated performance and
should be used for development purposes only.
## Prerequisites
This tutorial requires the following:
* [Docker](#docker)
* Kinetica Developer Edition
### Docker
Docker can be downloaded from the Docker store:
* **Mac**: [https://store.docker.com/editions/community/docker-ce-desktop-mac](https://store.docker.com/editions/community/docker-ce-desktop-mac)
* **Linux**: [https://docs.docker.com/install/linux/docker-ce/centos/](https://docs.docker.com/install/linux/docker-ce/centos/)
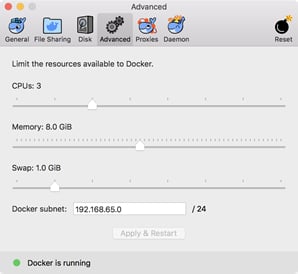
After installing, select the **Advanced** preferences and allocate at
least 6GB of memory for the VM as shown below.
The development process is streamlined because sections of code (or cells) can
be run iteratively while updating results and graphs. JupyterLab can be accessed
from a web browser and supports a Python console with tab completions, tooltips,
and visual output.
One of the difficulties of using Jupyter notebooks with Kinetica in the past had
been that environments needed to be installed with all the necessary
dependencies. In this tutorial, the process will be simplified with a Docker
image that integrates the components, so they can run locally on any Intel-based
machine.
The Docker image integrates the following major components:
* JupyterLab
* Kinetica 6.2
* CentOS 7
* Python 3.6
The Python environment has the necessary modules for:
* Interaction with Kinetica using ODBC or the native API
* Creating and executing Kinetica UDF’s
* Execution of ML Models on Kinetica (e.g. Pandas, PyTorch, TensorFlow)
The Kinetica Intel build does not give GPU-accelerated performance and
should be used for development purposes only.
## Prerequisites
This tutorial requires the following:
* [Docker](#docker)
* Kinetica Developer Edition
### Docker
Docker can be downloaded from the Docker store:
* **Mac**: [https://store.docker.com/editions/community/docker-ce-desktop-mac](https://store.docker.com/editions/community/docker-ce-desktop-mac)
* **Linux**: [https://docs.docker.com/install/linux/docker-ce/centos/](https://docs.docker.com/install/linux/docker-ce/centos/)
After installing, select the **Advanced** preferences and allocate at
least 6GB of memory for the VM as shown below.
 ## Install
All the required code is available in the kinetica-jupyterlab Git
repository:
* [https://github.com/kineticadb/kinetica-jupyterlab](https://github.com/kineticadb/kinetica-jupyterlab)
You can use git clone to fetch a local copy.
```bash theme={null}
git clone https://github.com/kineticadb/kinetica-jupyterlab
cd kinetica-jupyterlab
```
### Setting Permissions
The two volumes that will be mounted in Docker, docker/share &
notebooks, need to be writable by the image's `gpudb` user,
which has a `uid` of `1000`.
With some operating systems *(osxfs)*, this is managed automatically by Docker.
For others, the directories will need to be given permission directly. From the
kinetica-jupyterlab directory, run the following:
```bash theme={null}
chown -R 1000 docker/share notebooks
```
### Entering the License Key
The database is configured to start automatically, but for this to succeed, a
license key must be configured. Edit
docker/share/conf/gpudb.conf, uncomment the line with
`license_key`, and add the key:
```
# The license key to authorize running.
license_key =
```
If the key is invalid, the container will fail to start.
### Pulling the Image
This section will demonstrate how to use docker-compose to pull the
kinetica/kinetica-jupyterlab image from DockerHub.
From the kinetica-jupyterlab directory, go into the docker
directory and run docker-compose pull.
```bash theme={null}
cd docker
docker-compose pull
```
The docker image command can be used to verify the download.
```bash theme={null}
docker image list
```
Sample output:
```
REPOSITORY TAG IMAGE ID CREATED SIZE
kinetica/kinetica-jupyterlab 6.2 e9702b6e31fb 28 minutes ago 7.35GB
centos 7 49f7960eb7e4 7 weeks ago 200MB
```
## Managing the Container
This tutorial uses docker-compose to manage the parameters of the
container. This can simplify the configuration process, as all of the settings
are in the docker-compose.yml file.
### Starting
Run the below docker-compose up command to start the image. The
combined log output of Kinetica and JupyterLab will be displayed in the console.
This console needs to be open for as long as the container is running.
From the kinetica-jupyterlab/docker directory:
```bash theme={null}
docker-compose up
```
Sample output:
```
Creating network "docker_default" with the default driver
Creating gpudb-jupyterlab-6.x ... done
Attaching to gpudb-jupyterlab-6.x
[...]
gpudb-jupyterlab-6.x | 2018-07-25 23:45:04.516 INFO (2494,5923,r0/gpudb_sl_shtbl ) d0a1758a319b Utils/GaiaHTTPUtils.h:161 - JobId:1011; call_gaia_internal endpoint: /show/table completed in: 0.00193 s
```
### Using
To use a Unix shell in the container, open up a separate console session and run
the following from the kinetica-jupyterlab/docker directory:
```bash theme={null}
docker-compose exec gpudb /bin/bash
su - gpudb
```
### Stopping
To stop the container, use the docker-compose down command.
From the kinetica-jupyterlab/docker directory:
```bash theme={null}
docker-compose down
```
Sample output:
```
Stopping gpudb-jupyterlab-6.x ... done
Removing gpudb-jupyterlab-6.x ... done
Removing network docker_default
```
## Exploring the Environment
To access to GAdmin, open URL [http://localhost:8080](http://localhost:8080) and log in as an admin
user *(default username/password is* `admin`/`admin` *)*.
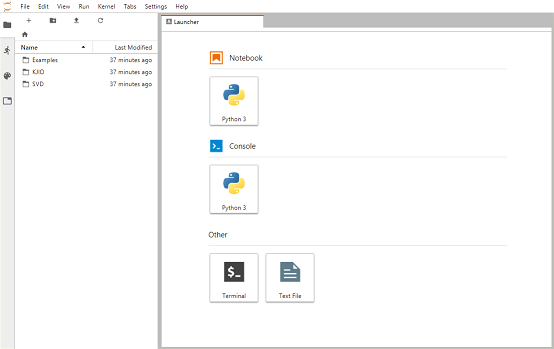
To access JupyterLab, open URL [http://localhost:8888](http://localhost:8888) and enter password
`kinetica`. When logged in, the file browser will appear on the left.
## Install
All the required code is available in the kinetica-jupyterlab Git
repository:
* [https://github.com/kineticadb/kinetica-jupyterlab](https://github.com/kineticadb/kinetica-jupyterlab)
You can use git clone to fetch a local copy.
```bash theme={null}
git clone https://github.com/kineticadb/kinetica-jupyterlab
cd kinetica-jupyterlab
```
### Setting Permissions
The two volumes that will be mounted in Docker, docker/share &
notebooks, need to be writable by the image's `gpudb` user,
which has a `uid` of `1000`.
With some operating systems *(osxfs)*, this is managed automatically by Docker.
For others, the directories will need to be given permission directly. From the
kinetica-jupyterlab directory, run the following:
```bash theme={null}
chown -R 1000 docker/share notebooks
```
### Entering the License Key
The database is configured to start automatically, but for this to succeed, a
license key must be configured. Edit
docker/share/conf/gpudb.conf, uncomment the line with
`license_key`, and add the key:
```
# The license key to authorize running.
license_key =
```
If the key is invalid, the container will fail to start.
### Pulling the Image
This section will demonstrate how to use docker-compose to pull the
kinetica/kinetica-jupyterlab image from DockerHub.
From the kinetica-jupyterlab directory, go into the docker
directory and run docker-compose pull.
```bash theme={null}
cd docker
docker-compose pull
```
The docker image command can be used to verify the download.
```bash theme={null}
docker image list
```
Sample output:
```
REPOSITORY TAG IMAGE ID CREATED SIZE
kinetica/kinetica-jupyterlab 6.2 e9702b6e31fb 28 minutes ago 7.35GB
centos 7 49f7960eb7e4 7 weeks ago 200MB
```
## Managing the Container
This tutorial uses docker-compose to manage the parameters of the
container. This can simplify the configuration process, as all of the settings
are in the docker-compose.yml file.
### Starting
Run the below docker-compose up command to start the image. The
combined log output of Kinetica and JupyterLab will be displayed in the console.
This console needs to be open for as long as the container is running.
From the kinetica-jupyterlab/docker directory:
```bash theme={null}
docker-compose up
```
Sample output:
```
Creating network "docker_default" with the default driver
Creating gpudb-jupyterlab-6.x ... done
Attaching to gpudb-jupyterlab-6.x
[...]
gpudb-jupyterlab-6.x | 2018-07-25 23:45:04.516 INFO (2494,5923,r0/gpudb_sl_shtbl ) d0a1758a319b Utils/GaiaHTTPUtils.h:161 - JobId:1011; call_gaia_internal endpoint: /show/table completed in: 0.00193 s
```
### Using
To use a Unix shell in the container, open up a separate console session and run
the following from the kinetica-jupyterlab/docker directory:
```bash theme={null}
docker-compose exec gpudb /bin/bash
su - gpudb
```
### Stopping
To stop the container, use the docker-compose down command.
From the kinetica-jupyterlab/docker directory:
```bash theme={null}
docker-compose down
```
Sample output:
```
Stopping gpudb-jupyterlab-6.x ... done
Removing gpudb-jupyterlab-6.x ... done
Removing network docker_default
```
## Exploring the Environment
To access to GAdmin, open URL [http://localhost:8080](http://localhost:8080) and log in as an admin
user *(default username/password is* `admin`/`admin` *)*.
To access JupyterLab, open URL [http://localhost:8888](http://localhost:8888) and enter password
`kinetica`. When logged in, the file browser will appear on the left.
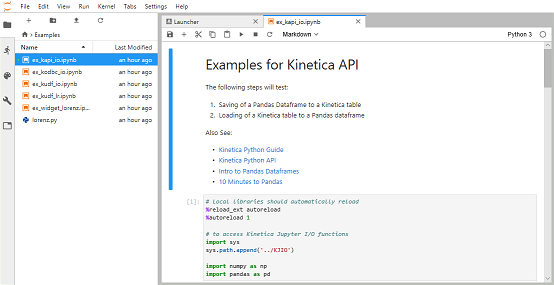
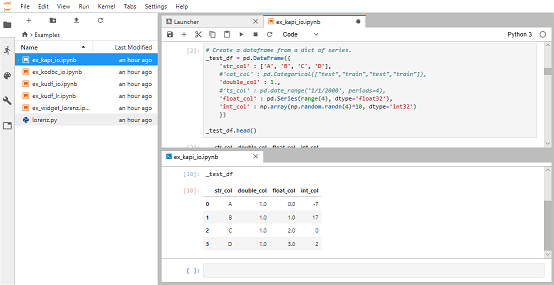
 Navigate to the Examples folder, and open notebook
ex\_kapi\_io.ipynb. This notebook demonstrates basic interactions between
Pandas dataframes and Kinetica via the functions in the KIJO module.
Navigate to the Examples folder, and open notebook
ex\_kapi\_io.ipynb. This notebook demonstrates basic interactions between
Pandas dataframes and Kinetica via the functions in the KIJO module.
 Select **Kernel -> Restart Kernel** and
**Run All Cells...** to clear the outputs. Then select the first
cell and click the **Play** button to run each cell. Each notebook
has a separate Python process or kernel that remembers the variables that were
created when cells were executed. Cells can be modified and re-executed without
starting from the beginning.
A Python console can also be attached to the same kernel as a notebook. Right
click on a cell and select **New Console For Notebook**. Enter one
of the variables executed from the notebook (e.g. `_test_df`) and then press
**Shift+Enter** to see the contents in the console.
Select **Kernel -> Restart Kernel** and
**Run All Cells...** to clear the outputs. Then select the first
cell and click the **Play** button to run each cell. Each notebook
has a separate Python process or kernel that remembers the variables that were
created when cells were executed. Cells can be modified and re-executed without
starting from the beginning.
A Python console can also be attached to the same kernel as a notebook. Right
click on a cell and select **New Console For Notebook**. Enter one
of the variables executed from the notebook (e.g. `_test_df`) and then press
**Shift+Enter** to see the contents in the console.
 Use **Tab** for term completions and **Shift+Tab** for
tooltips.
## JupyterLab Contents
This repository contains an integrated environment that provides accelerated
development of Kinetica-based ML Models. It makes use of CentOS 7, Kinetica,
JupyterLab, and Python 3.6 for this purpose.
JupyterLab has the following Python 3.6 libraries for integrating ML libraries
with Kinetica:
* [Kinetica Python API](/content/guides/python_guide)
* [Kinetica UDF API](/content/udf/python/writing)
* [PyODBC](https://github.com/mkleehammer/pyodbc/wiki/Getting-started)
It also has the following libraries for ML model development:
* [Pandas](http://pandas.pydata.org/pandas-docs/stable/dsintro.html)
* [PyTorch](https://jhui.github.io/2018/02/09/PyTorch-Basic-operations)
* [SciPy](https://docs.scipy.org/doc/scipy/reference)
* [Scikit-learn](http://scikit-learn.org/stable/documentation.html)
* [MatPlotLib](https://matplotlib.org/contents.html)
* [TensorFlow](https://www.tensorflow.org/tutorials)
Example Notebooks are provided that demonstrate:
* Connectivity between Pandas Dataframes and Kinetica with ODBC and the native
API
* ML models including an SVD recommender
Within the kinetica-jupyterlab directory, there are two directories of
note:
* docker - contains the scripts necessary to build and run the Docker
image
* notebooks - contains notebooks and Python scripts needed to run them;
will be mounted inside the image and its contents will be visible in
JupyterLab
### Mounted Volumes
| Host Location | Mount Point |
| ------------------------------------------------------------ | ------------------------------------------ |
| kinetica-jupyterlab/docker/share | /opt/share |
| kinetica-jupyterlab/notebooks | /opt/notebooks |
### Example Notebooks
Example notebooks are located in notebooks/Examples, which document and
demonstrate interaction of JupyterLab with Kinetica.
| Notebook File | Description |
| ---------------------------------------------------- | -------------------------------------------------------------------------------- |
| ex\_kapi\_io.ipynb | Load/Save Pandas Dataframes with the Kinetica REST API |
| ex\_kodbc\_io.ipynb | Load/Save Pandas Dataframes with the Kinetica ODBC |
| ex\_kudf\_io.ipynb | Create/Execute a UDF to calculate sum-of-squares |
| ex\_kudf\_lr.ipynb | Create/Execute a UDF to calculate linear regression with distributed inferencing |
| ex\_widget\_lorenz.ipynb | Example of real-time refresh of calculation with widgets |
### SVD Recommender and Visualization Example
The following set of notebooks contain an example of how to use SVD with
Kinetica to build a recommender engine. The notebooks generate result tables and
must be executed in-order.
| Notebook | Description |
| ------------------------------------------------------- | --------------------------------------- |
| svd\_1\_ingest.ipynb | Download and ingest Amazon rating data |
| svd\_2\_calc.ipynb | Calculate SVD matrices and save results |
| svd\_3\_recommend.ipynb | Demonstration of a recommender |
| svd\_4\_visualization.ipynb | Clustering and visualization with SVD |
### KJIO Utility Library
A set of utility functions collectively called *Kinetica Jupyter I/O* are
located in notebooks/KJIO to simplify the task of interacting with
Kinetica from notebooks. The example notebooks demonstrate their functionality.
| Script | Description |
| ----------------------------------------- | ------------------------------------------------------ |
| kapi\_io.py | Loads and saves Dataframes to/from Kinetica tables |
| kmodel\_io.py | Loads and saves ML models with a Kinetica table |
| kodbc\_io.py | Interacts with tables using ODBC |
| kudf\_io.py | Functions that simplify creation and execution of UDFs |
## Conclusion
The JupyterLab environment integrates many components. With it, external
datasources can be ingested, the data analyzed with some of the most powerful ML
libraries, the results saved to Kinetica, the data further processed with UDFs,
and each step visualized, all in a single notebook. Use cases can have
documentation and equations added to aid in telling a data-driven story to
multiple audiences.
## References
Additional online resources are available here:
* [Project Jupyter Home](http://jupyter.org/)
* [28 Jupyter Notebook tips, tricks, and shortcuts](https://www.dataquest.io/blog/jupyter-notebook-tips-tricks-shortcuts/)
* [JupyterLab Documentation](http://jupyterlab.readthedocs.io/en/latest/)
* [IPython Documentation](https://ipython.readthedocs.io/en/stable/index.html)
Use **Tab** for term completions and **Shift+Tab** for
tooltips.
## JupyterLab Contents
This repository contains an integrated environment that provides accelerated
development of Kinetica-based ML Models. It makes use of CentOS 7, Kinetica,
JupyterLab, and Python 3.6 for this purpose.
JupyterLab has the following Python 3.6 libraries for integrating ML libraries
with Kinetica:
* [Kinetica Python API](/content/guides/python_guide)
* [Kinetica UDF API](/content/udf/python/writing)
* [PyODBC](https://github.com/mkleehammer/pyodbc/wiki/Getting-started)
It also has the following libraries for ML model development:
* [Pandas](http://pandas.pydata.org/pandas-docs/stable/dsintro.html)
* [PyTorch](https://jhui.github.io/2018/02/09/PyTorch-Basic-operations)
* [SciPy](https://docs.scipy.org/doc/scipy/reference)
* [Scikit-learn](http://scikit-learn.org/stable/documentation.html)
* [MatPlotLib](https://matplotlib.org/contents.html)
* [TensorFlow](https://www.tensorflow.org/tutorials)
Example Notebooks are provided that demonstrate:
* Connectivity between Pandas Dataframes and Kinetica with ODBC and the native
API
* ML models including an SVD recommender
Within the kinetica-jupyterlab directory, there are two directories of
note:
* docker - contains the scripts necessary to build and run the Docker
image
* notebooks - contains notebooks and Python scripts needed to run them;
will be mounted inside the image and its contents will be visible in
JupyterLab
### Mounted Volumes
| Host Location | Mount Point |
| ------------------------------------------------------------ | ------------------------------------------ |
| kinetica-jupyterlab/docker/share | /opt/share |
| kinetica-jupyterlab/notebooks | /opt/notebooks |
### Example Notebooks
Example notebooks are located in notebooks/Examples, which document and
demonstrate interaction of JupyterLab with Kinetica.
| Notebook File | Description |
| ---------------------------------------------------- | -------------------------------------------------------------------------------- |
| ex\_kapi\_io.ipynb | Load/Save Pandas Dataframes with the Kinetica REST API |
| ex\_kodbc\_io.ipynb | Load/Save Pandas Dataframes with the Kinetica ODBC |
| ex\_kudf\_io.ipynb | Create/Execute a UDF to calculate sum-of-squares |
| ex\_kudf\_lr.ipynb | Create/Execute a UDF to calculate linear regression with distributed inferencing |
| ex\_widget\_lorenz.ipynb | Example of real-time refresh of calculation with widgets |
### SVD Recommender and Visualization Example
The following set of notebooks contain an example of how to use SVD with
Kinetica to build a recommender engine. The notebooks generate result tables and
must be executed in-order.
| Notebook | Description |
| ------------------------------------------------------- | --------------------------------------- |
| svd\_1\_ingest.ipynb | Download and ingest Amazon rating data |
| svd\_2\_calc.ipynb | Calculate SVD matrices and save results |
| svd\_3\_recommend.ipynb | Demonstration of a recommender |
| svd\_4\_visualization.ipynb | Clustering and visualization with SVD |
### KJIO Utility Library
A set of utility functions collectively called *Kinetica Jupyter I/O* are
located in notebooks/KJIO to simplify the task of interacting with
Kinetica from notebooks. The example notebooks demonstrate their functionality.
| Script | Description |
| ----------------------------------------- | ------------------------------------------------------ |
| kapi\_io.py | Loads and saves Dataframes to/from Kinetica tables |
| kmodel\_io.py | Loads and saves ML models with a Kinetica table |
| kodbc\_io.py | Interacts with tables using ODBC |
| kudf\_io.py | Functions that simplify creation and execution of UDFs |
## Conclusion
The JupyterLab environment integrates many components. With it, external
datasources can be ingested, the data analyzed with some of the most powerful ML
libraries, the results saved to Kinetica, the data further processed with UDFs,
and each step visualized, all in a single notebook. Use cases can have
documentation and equations added to aid in telling a data-driven story to
multiple audiences.
## References
Additional online resources are available here:
* [Project Jupyter Home](http://jupyter.org/)
* [28 Jupyter Notebook tips, tricks, and shortcuts](https://www.dataquest.io/blog/jupyter-notebook-tips-tricks-shortcuts/)
* [JupyterLab Documentation](http://jupyterlab.readthedocs.io/en/latest/)
* [IPython Documentation](https://ipython.readthedocs.io/en/stable/index.html)