Kinetica Blackbox Software Development Kit (SDK) Guide
The Kinetica Blackbox SDK assists users in creating blackbox models to wrap existing code/functionality and make it deployable within the Kinetica system. The Active Analytics Workbench (AAW) currently can only import blackbox models that have been containerized and implement the BlackBox SDK. Users provide the Python module scripts, modify some SDK files, and the SDK will build a Docker Container from the files and publish it to a given Docker Registry (private or public).
For help with containerizing models, the Kinetica Blackbox Wizard is available via the Model + Analytics portion of the AAW User Interface (UI).
Download and Configuration
Download the Blackbox SDK from GitHub and select a version that is compatible with the current database version. The SDK version should be less than or equal to the current version of the database that the blackbox model will be running against. For example, if Kinetica is at version 7.0.3.0, the SDK tag version should be less than or equal to 7.0.3.0.
Clone the project and change directory into the folder:
git clone https://github.com/kineticadb/container-kml-blackbox-sdk.git
cd container-kml-blackbox-sdk
Get a list of tags, which correspond to Blackbox SDK versions, for the repository:
git tag -l
Checkout the desired tagged version of the repository:
git checkout tags/<tag_name>
Note
The latest version compatible is preferred.
Setup
The repository contains all the files needed to build and publish a blackbox model Docker container compatible with AAW. The important files and their function:
Warning
It's highly recommended the sdk/* and bb_runner.sh files
are not modified!
| Filename | Description |
|---|---|
sdk/bb_runner.py |
Python script called from the Docker container entrypoint script. Contains the code
necessary for the module(s) to interface with the kinetica_black_box.py script. |
sdk/kinetica_black_box.py |
Python script called from bb_runner.py. Contains the code necessary for the
blackbox module(s) to interface with the database. |
Dockerfile |
File containing all the instructions for Docker to build the model image properly. |
bb_module_default.py |
Python script containing model code. The default code is a template for you to reuse and/or replace. |
bb_runner.sh |
Entrypoint for the Docker container; this script will be run initially when AAW pulls the container for execution. |
release.sh |
Utility script for building and publishing the model to a Docker Hub or Docker Registry. |
requirements.txt |
Text file that stores the required python libraries for the model. Default libraries
(gpudb, zmq, requests) must be left intact. |
To setup the repository for publishing your model:
Update
bb_module_default.pywith the desired model code. The model can contain as many methods as desired or call as many other modules as desired, but the default method must take a dictionary in (inMap) and return a dictionary (outMap):import math def predict_taxi_fare(inMap=None): # method code ... # Calculate fare amount from trip distance fare_amount = (dist * 3.9) outMap = {'fare_amount': fare_amount} return outMap
Optionally, update the name of
bb_module_default.py. If the module name is updated, it will need to be referenced appropriately when deploying the model via the AAW UI or the AAW REST API. See Usage for more information.Open the
Dockerfilein an editor and include any required installations that are not easily installable withpip:RUN apt-get install -y git wget
Add all module files:
ADD <module file.py> ./
Important
By default, the
Dockerfileincludes a reference tobb_module_default.py. This reference must be updated if the file name was changed earlier.Open
requirements.txtin an editor and include any additional required python libraries, e.g.,numpy==1.16.3 tensorflow
Important
The default
gpudb,zmq, andrequestspackages insiderequirements.txtmust be left in the file.Open
release.shin a text editor and update the repository, image, and tag for both thebuildandpushstatements:docker build -f Dockerfile -t <repo-name>/<image-name>:<tag-name> . docker push <repo-name>/<image-name>:<tag-name>
Tip
The Docker repository will be created if it doesn't exist.
Usage
Publishing the Model
Login into your Docker Hub or Docker Registry:
# Docker Hub
docker login

# Docker Registry
docker login <hostname>:<port>
Run the
release.shscript to build a Docker image of the model and publish it to the provided Docker Hub or Docker Registry:./release.sh
Importing the Model
After publishing the model, it can be imported into AAW using two methods:
- REST API (via
cURL) - AAW User Interface (UI)
REST API
If using the REST API, a model is defined using JSON. The cURL command line
tool can be used to send a JSON string or file to AAW. To import a blackbox
model into AAW using cURL and the REST API:
Define the model. Kinetica recommends placing the model definition inside a local JSON file.
Post the JSON to the
/model/blackbox/instance/createendpoint of the AAW REST API:# Using a JSON file curl -X POST -H "Content-Type: application/json" -d @<model_file>.json http://<kinetica-host>:9187/kml/model/blackbox/instance/create # Using a JSON string curl -X POST -H "Content-Type: application/json" -d '{"model_inst_name": "<model_name>", ... }' http://<kinetica-host>:9187/kml/model/blackbox/instance/create
To aid in creating the necessary JSON, use the following endpoint and schema:
Endpoint name: /model/blackbox/instance/create
Input parameters:
| Name | Type | Description | |||||||||||||||||||||
|---|---|---|---|---|---|---|---|---|---|---|---|---|---|---|---|---|---|---|---|---|---|---|---|
model_inst_name |
string | Name of the model. | |||||||||||||||||||||
model_inst_desc |
string | Optional description of the model. | |||||||||||||||||||||
problem_type |
string | Problem type for the model. Always BLACKBOX. |
|||||||||||||||||||||
model_type |
string | Type for the model. Always BLACKBOX. |
|||||||||||||||||||||
input_record_type |
array of map(s) of strings to strings | An array containing a map for each input column. Requires two keys:
Important There will need to be as many maps (containing both name and type)
as there are columns in the |
|||||||||||||||||||||
model_config |
map of strings to various | A map containing model configuration information.
Important There will need to be as many maps in |
Example JSON:
The final JSON string should look similar to this:
{
  "model_inst_name": "Taxi Fare Predictor",
  "model_inst_desc": "Blackbox model for on-demand deployments",
  "problem_type": "BLACKBOX",
  "model_type": "BLACKBOX",
  "input_record_type": [
    {
      "col_name": "pickup_longitude",
      "col_type": "float"
    },
    {
      "col_name": "pickup_latitude",
      "col_type": "float"
    },
    {
      "col_name": "dropoff_longitude",
      "col_type": "float"
    },
    {
      "col_name": "dropoff_latitude",
      "col_type": "float"
    }
  ],
  "model_config": {
    "db_user": "",
    "db_pass": "",
    "blackbox_module": "bb_module_default",
    "blackbox_function": "predict_taxi_fare",
    "container": "kinetica/kinetica-blackbox-quickstart:latest",
    "output_record_type": [
      {
        "col_name": "fare_amount",
        "col_type": "double"
      }
    ]
  }
}
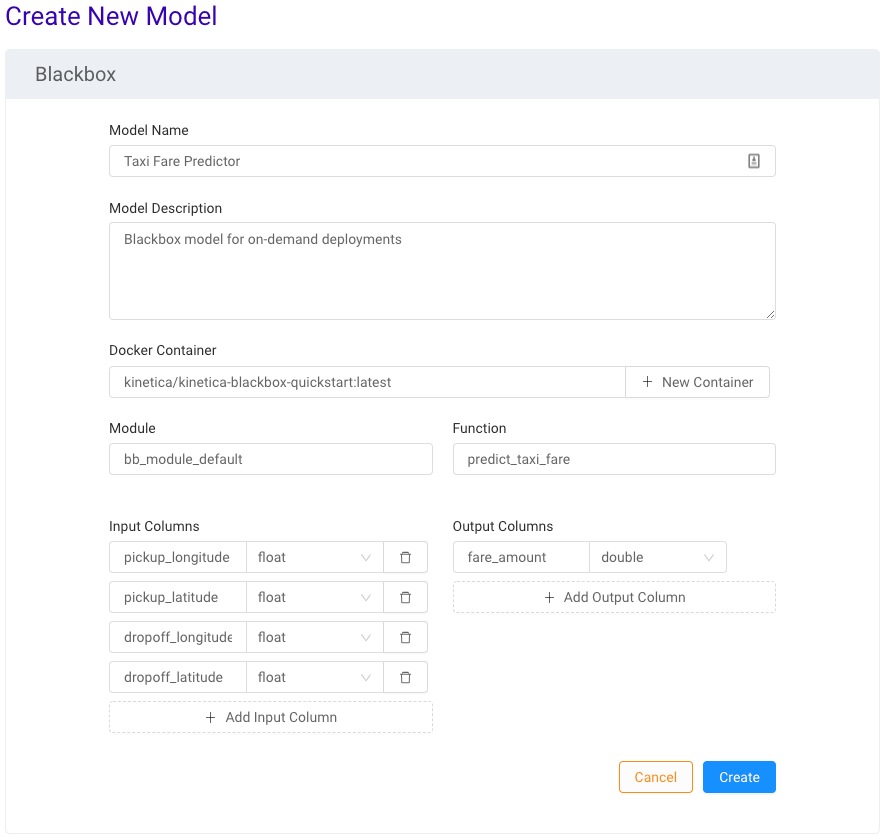
AAW User Interface (UI)
The AAW UI offers a simpler WYSIWYG-style approach to importing a blackbox model. To import a blackbox model into the UI:
- Navigate to the AAW UI (
http://<aaw-host>:8070) - Click Models + Analytics.
- Click .
- Under Create a Blackbox Model Manually, click Create.
- Provide a Model Name and optional Model Description.
- Input the Docker URI for the container, e.g.,
<repo_name>/<image_name>:<tag_name> - Input the Module Name and Module Function.
- For Input Columns:
- Click Add Input Column to create input columns.
- Provide a Column name and Type.
- For Output Columns:
- Click Add Output Column to create output columns.
- Provide a Column name and Type.
- Click Create.
Example UI:
The final UI inputs should look similar to this:
Upgrading
Upgrading the SDK is as simple as pulling in the base Blackbox SDK repository into a local fork and pushing the upgraded files to a remote repository.
Change into the directory containing the Blackbox SDK fork and checkout the
masterbranch:cd ~/<repo-name> && git checkout master
Ensure all changes are checked-in and the
masterbranch is clean:git status
Backup the entire local repository:
git archive --format=tar -o ../<repo-name>.master_$(date +"%Y-%m-%d_%T").tar HEAD
Pull the desired branch from the base Blackbox SDK repository into your local fork:
git pull https://github.com/kineticadb/container-kml-blackbox-sdk release/<version>
Resolve conflicts and stage the appropriate changes.
Important
Make special note of any files to be added because they may contain release artifacts and repositories from the base Blackbox SDK repository.
Publish the upgraded model and verify the release log looks correct:
./release.sh && cat docker_release.log
Commit the merge and post-publishing artifacts:
git commit -m "Upgrading models to <version> SDK and publishing."
Review the changes and push them up:
git push
Optionally, remove the backup:
rm -rf ../<repo-name>.master*.tar