Kinetica Installation with KAgent (Amazon Web Services)
Kinetica installation and configuration instructions using KAgent for Amazon Web Services (AWS).
Prerequisites
Prior to provisioning AWS instances for Kinetica, there are a few setup steps to prepare your AWS environment:
- Ensure the AWS user that will provision EC2 instances using KAgent has the
AmazonEC2FullAccessAWS IAM policy - Create an access key for the AWS user that will provision EC2 instances using KAgent and save the CSV file containing the access key locally
- Create an EC2 key pair for the AWS user that will provision EC2 instances
using KAgent and save the
.pemfile locally
KAgent Installation
KAgent can be installed in two ways:
- Deployment of the installation package on a RHEL or Debian/Ubuntu system
- Via Docker
Important
KAgent requires that the 8081 port be made available on the
host
Manual Install
KAgent can be deployed on any server inside or outside the cluster. Deploy the package using the standard procedures for a local package:
On RHEL:
sudo yum install ./kagent-<version>.<architecture>.rpm
On Debian/Ubuntu:
sudo apt install ./kagent-<version>.<architecture>.deb
This installs the package to the directory /opt/gpudb/kagent and
registers and starts the kagent-ui service. KAgent will open port 8081
on the local firewall (if enabled).
Docker
After installing Docker, run the following via a local terminal:
sudo docker run -d -p 8081:8081 kinetica/kagent
The latest KAgent Docker image will be pulled and a container will be started.
Kinetica Installation
Installation of Kinetica on AWS using KAgent involves the automated deployment of the installation package via either a browser-based UI or console-driven CLI.
Important
The installation process requires a license key. To receive a license key, contact support at support@kinetica.com.
KAgent UI

After installing KAgent, the KAgent UI displays an overview page as well as access to KAgent administration tools, cluster setup, and cluster components. KAgent is accessible via the following URL:
http://<kagent-host>:8081/kagent
- Click Rings to view the rings for the cluster; rings are used
for high availability setups and to help organize
clusters. To setup a ring:
- Click Add Ring
- Provide a ring label
- Click Add
- Click Add Cluster to jump to the cluster setup process.
- Click Clone to open the Clone Clusters interface. From here, a source cluster's authentication settings, users, and data can be cloned to a target cluster. Review Clone for more information.
- Click Jobs to view completed and active KAgent jobs.
- Click Logs to view KAgent logs.
- Click
 to view the console.
To access the KAgent UI and begin setting up a cluster:
Ensure the KAgent service is started:
service kagent_ui status
Browse to the KAgent UI using IP or host name:
http://<kagent-host>:8081/kagent
Optionally, if using custom rings, i.e. not the
defaultring, click Rings then click Clusters next to the desired ring.Click Add New or Existing Cluster.
Note
Once in the setup process, click Clusters to exit setup and return to the start; click Logs to view KAgent logs; click Console to open the console log.
Cluster
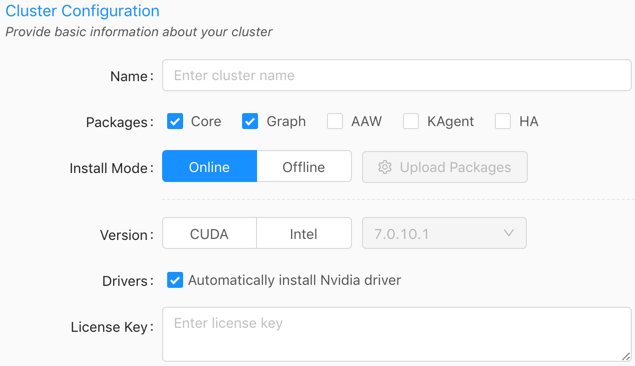
Enter a name for the cluster. The name cannot contain spaces or underscores.
Optionally, select to install Graph if a node should have the graph server installed on it. See Network Graphs & Solvers Concepts for more information.
Optionally, select to install AAW (Active Analytics Workbench) if a node should have AAW installed on it.
Optionally, select to install KAgent if a node should also have KAgent installed on it. See Nodes for more information.
Optionally, select to install HA if setting up an HA ring. Review High Availability Configuration & Management for more information.
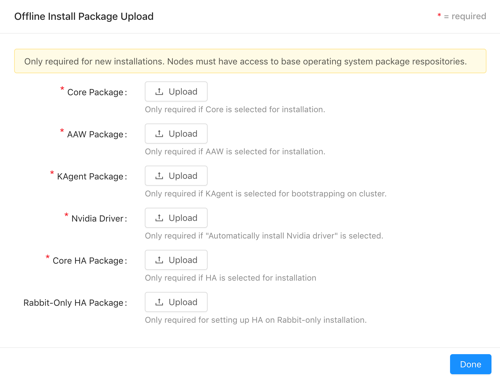
For the Install Mode, select either Online (install directly from the online Kinetica repository) or Offline (install from uploaded packages). If Offline is selected, click Upload Packages, then upload a package file for each component or driver desired for the installation.
Important
If performing an offline installation, all necessary dependencies will need to be installed prior to cluster setup.
For the Version, select either CUDA (GPU) or Intel (CPU-only) to determine the package variant to install.
If the Version is set to CUDA, select Automatically install Nvidia driver. This will automatically configure the server(s) for an Nvidia GPU driver and install the most compatible driver.
Enter the license key.
If AAW is selected to install, select a K8 Setup:
Automatic -- KAgent will install Kubernetes / KubeCTL and upload a default configuration file.
Important
Before installing the embedded Kubernetes cluster, review the Kubernetes Considerations.
Custom -- Upload a configuration file for an already existing Kubernetes installation and provide a public IP address for the server hosting the Kubernetes installation. Note that AAW requires Kubernetes; see Active Analytics Workbench (AAW) Overview for more information.
Click Next.
Deployment
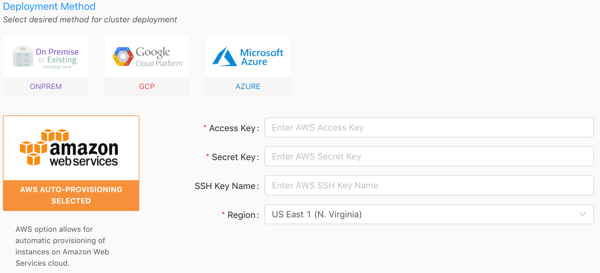
- Select the Amazon Web Services deployment method.
- For Access Key, provide the Access Key ID from the access key CSV you created in Prerequisites.
- For Secret Key, provide the Secret Access Key from the access key CSV you created in Prerequisites.
- For SSH Key Name, provide the EC2 Key name for the key pair you created in Prerequisites.
- Select a region.
- Click Next.
Security
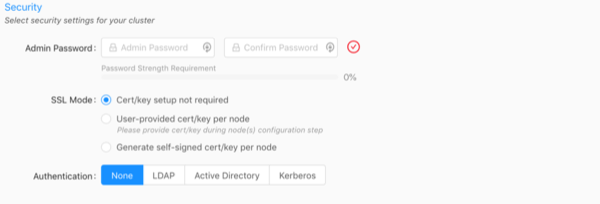
Enter and confirm an Admin Password. It must meet the password strength requirements.
Important
This is the password used to access Reveal, Active Analytics Workbench (AAW), and GAdmin as the default Admin user.
Select an SSL Mode:
- Cert/key setup not required -- Kinetica will not require SSL certificate/key creation/upload and SSL will not be enabled
- User-provided cert/key per node -- user must upload an SSL
certificate and key for each node; Kinetica copies the cert/key pair
to
/opt/gpudb/certs, enables HTTPD, and configures HTTPD to use HTTPS - Generate self-signed cert/key per node -- KAgent generates
a self-signed certificate and key for each node and places it in
/opt/gpudb/certs, enables HTTPD, and configures HTTPD to use HTTPS
Select an Authentication type and fill the fields as necessary:
- None -- no authentication or authorization
- LDAP -- configures Kinetica to authenticate via LDAP; requires authentication to connect to the database, enables authorization, enables external authentication, automatically creates users in the database for LDAP users, and automatically grants roles in the database to LDAP users
- Active Directory -- configures Kinetica to authenticate via Microsoft Active Directory; requires authentication to connect to the database, enables authorization, enables external authentication, automatically creates users in the database for Active Directory users, and automatically grants roles in the database to Active Directory users
- Kerberos -- configures Kinetica to authenticate via Kerberos; requires authentication to connect to the database, enables authorization, enables external authentication, automatically creates users in the database for Kerberos users, and automatically grants roles in the database to Kerberos users
Warning
No SSL or authentication is not recommended! For more information on security configurations and settings as well as how to manually configure Kinetica for a secure setup, see Security Configuration.
Click Next.
Nodes
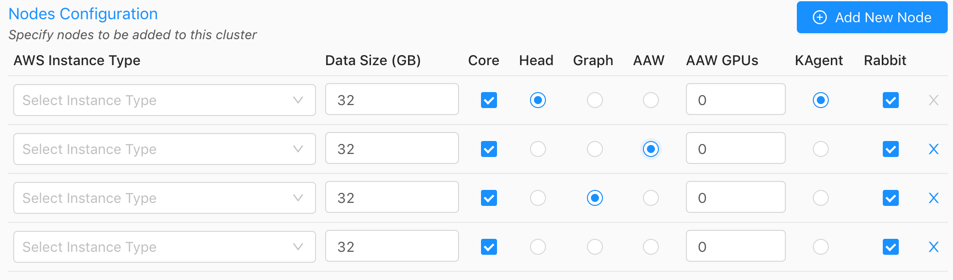
Click Add New Node until there are the desired number of nodes that will have Kinetica (and potentially other services) installed on them.
For each node, select an AWS Instance Type and update the Data Size if necessary.
Optionally, if the
User-provided cert/key per nodeSSL Mode was selected, click the lock icon in the SSL column and upload the SSL cert and key for each node.Select if each node should have the Core package installed. The Core package contains access to the database and its core components and functionality. Note that if the core package is installed on a node, that node cannot be designated as the Head Node.
Select the desired node for the Head Node using the corresponding radio button. This server will receive user requests and parcel them out to the other worker nodes of the system. The head node of the cluster (or only node in a single-node system) will also be used for the administration of the cluster, and by default, the hosting of Reveal and GAdmin and as such, will require special handling during the installation process.
Note
All services and privileges (Head, Graph, AAW, KAgent) can exist on a single node if desired, assuming there are enough resources to handle it.
Optionally, if the
Graphpackage was selected for install in Cluster, select the desired node for the Graph node using the corresponding radio button. The graph node hosts the graph server. The graph node does not need to have the Core package enabled.Optionally, if opting to install AAW, select the desired node to host the service. The AAW node does not need to have the Core package enabled. Also, set the number of reserved GPUs for AAW to use for each node.
Important
Some features of AAW require GPUs to work or have increased performance. Review the AAW documentation for more information.
Optionally, if opting to install KAgent, select the desired node to host the service. The KAgent node does not need to have the Core package enabled.
Select if each node should have Rabbit (RabbitMQ) installed. Ensure at least one node will have RabbitMQ installed if enabling High Availability (HA) for the cluster; select 2 or more nodes to have RabbitMQ installed for redundant queues. A node does not have to host any other services other than RabbitMQ if desired.
Click Next.
Credentials
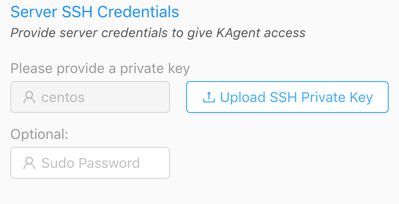
- For the Server SSH Credentials, upload the
.pemkey that will be used to access the node(s). This key should match the key name provided in Deployment. - Optionally, enter a
sudopassword for the instance(s). - Click Next.
Installation
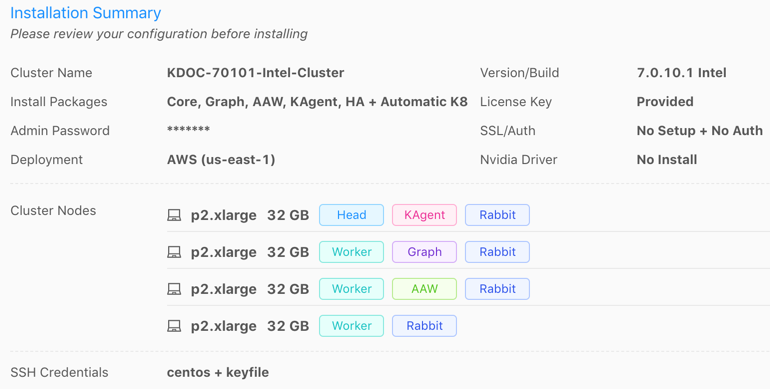
Review the Installation Summary to ensure there are no validation errors in the information.
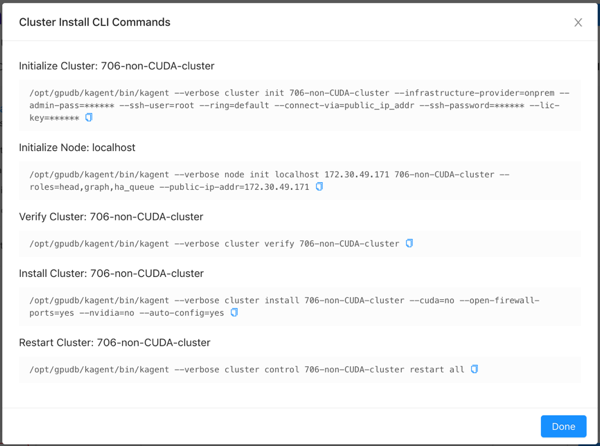
Tip
Click CLI Commands to view and/or copy the KAgent command line interface commands that will be run in the background (order is from top to bottom).
Click Install. KAgent will open a window displaying the progress of the installation.
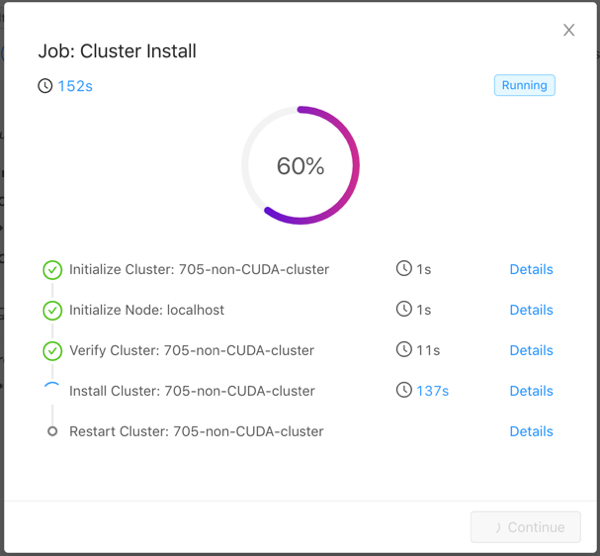
Tip
Click Details next to a step to see stdout and stderr for that step. Click
 to copy the displayed text.
The installation may take a while as KAgent initializes each node in the
cluster, verifies the cluster, adds a repository, downloads the package, installs
the package to the directory /opt/gpudb, creates a group named
gpudb, and two users (gpudb & gpudb_proc) whose home directories are
located in /home/gpudb. This will also register two services: gpudb
& gpudb_host_manager.
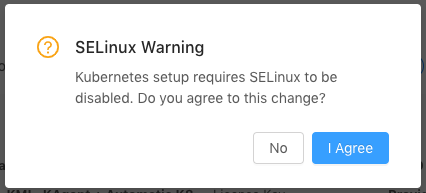
Important
If Automatic Kubernetes (K8) installation was selected and Kinetica is being installed on a RHEL-based system, KAgent will request permission to disable SELinux on the nodes. Kubernetes cannot be installed otherwise. Click I Agree to continue with the installation; click No to stop the installation and manually disable SELinux.
After a successful installation, if KAgent was also installed on a separate node, one can be redirected to the KAgent on that cluster node. If KAgent was not installed, one can be redirected to GAdmin.
Tip
GAdmin can always be found by browsing to the head node, using IP or host name:
http://<head-node-host>:8080/
KAgent can always be found by browsing to the node hosting it, using IP or host name:
http://<kagent-host>:8081/
Validation
To validate that Kinetica has been installed and started properly, you can perform the following tests.
Curl Test
To ensure that Kinetica has started (you may have to wait a moment while the system initializes), you can run curl on the head node to check if the server is responding and port is available with respect to any running firewalls:
$ curl localhost:9191
Kinetica is running!
API Test
You can also run a test to ensure that the API is responding properly. There is an admin simulator project in Python provided with the Python API, which pulls statistics from the Kinetica instance. Running this on the head node, you should see:
$ /opt/gpudb/bin/gpudb_python /opt/gpudb/kitools/gadmin_sim.py
Collection 'SYSTEM' child tables: 1 total elements: 1 total objects: 1
|
 --------Table 'ITER' elements: 1 objects: 1 ttl: -1 remaining ttl: -1 type id: UNSET_TYPE_ID label: ''
**********************
Total tables:              1
Total top-level tables:    0
Total collections:         1
Total number of elements:  1
Total number of objects:   1
GAdmin Status Check
The administrative interface itself can be used to validate that the system is functioning properly. Simply log into GAdmin. Browse to Dashboard to view the status of the overall system and Ranks to view the status breakdown by rank.
Ingest/Read Check
After verifying Kinetica has started and its components work, you should confirm ingesting and reading data works as expected.
- Navigate to the Demo tab on the Cluster page.
- Click Load Sample Data under the NYC Taxi section. Confirm the data loading.
- Once the data is finished loading, click View Loaded Data. The
data should be available in the
nyctaxitable located in theMASTERcollection.
If Reveal is enabled:
Navigate to:
http://<head-node-ip-address>:8088/
Log into Reveal and change the administration account's default password.
Click NYC Taxi under Dashboards. The default NYC Taxi dashboard should load.
Core Utilities
Kinetica comes packaged with many helpful server and support executables that
can be found in /opt/gpudb/core/bin/ and /opt/gpudb/bin. Note that any
of the gpudb_hosts_*.sh scripts will operate on the hosts specified in
gpudb.conf. Run any of the following with the -h option for usage
information.
Important
For most of the utilities that use passwordless SSH, an AWS PEM
file can be specified instead using the -i option (with the exception
being the gpudb_hosts_persist_* scripts). If passwordless SSH is not
setup and no PEM file is specified, you will be prompted for a password
on each host.
Environment Configuration and Tools
Some of the most commonly used and important utilities are also available in the
/opt/gpudb/bin directory.
Note
This directory also contains the KI Tools suite
| Utility / Script | Uses Passwordless SSH | Description |
|---|---|---|
gpudb_env |
No | Utility to run a program and its given arguments after setting the PATH, LD_LIBRARY_PATH, PYTHON_PATH,
and others to the appropriate /opt/gpudb/ directories. Use this script or /opt/gpudb/bin/gpudb_python to
correctly setup the environment to run Kinetica's packaged Python version. You can also run
source /opt/gpudb/core/bin/gpudb_env.sh to have the current environment updated. |
gpudb_pip |
Yes | Script to run Kinetica's packaged pip version. Runs on all hosts. This can be used in place of pip,
e.g., /opt/gpudb/bin/gpudb_pip install gpudb |
gpudb_python |
No | Script to correctly setup the environment to run Kinetica's packaged Python version. This can be used in place
of the python command, e.g., /opt/gpubd/bin/gpudb_python my_python_file.py |
gpudb_udf_distribute_thirdparty |
No | Utility to mirror the local /opt/gpudb/udf/thirdparty to remote hosts. Creates a dated backup on the remote
host before copying |
Helper Scripts
Additional helper scripts and utilities are available in
/opt/gpudb/core/bin.
| Utility / Script | Uses Passwordless SSH | Description |
|---|---|---|
gpudb |
No | Run as gpudb user or root. The Kinetica system start/restart/stop/status script |
gpudb_cluster_cuda |
No | Server executable for CUDA clusters. Displays version and configuration information. This should only be run
by the gpudb executable (see above). |
gpudb_cluster_intel |
No | Server executable for Intel clusters. Displays version and configuration information. This should only be
run by the gpudb executable (see above). |
gpudb_config_compare.py |
No | Script to compare two configuration files: a "modified" configuration file and a "baseline" configuration file.
The script can also merge the files after outputting the diff. The merged file will use the "modified" file's
settings values if the "modified" configuration settings match the "baseline" configuration settings; if a setting
value is present in the "modified" file but not in the "baseline" file, the "baseline" setting value will be
used. Supports .ini, .conf, .config, .py, and .json files. |
gpudb_conf_parser.py |
No | Run using /opt/gpudb/bin/gpudb_python. Utility for parsing .ini files for scripts |
gpudb_decrypt.sh |
No | Utility for decrypting text encrypted by gpudb_encrypt.sh. See Obfuscating Plain-Text Passwords for details. |
gpudb_encrypt.sh |
No | Utility for encrypting text. See Obfuscating Plain-Text Passwords for details. |
gpudb_env.sh |
No | Utility to run a program and its given arguments after setting the PATH, LD_LIBRARY_PATH, PYTHON_PATH,
and others to the appropriate /opt/gpudb/ directories. Use this script or /opt/gpudb/bin/gpudb_python to
correctly setup the environment to setup the environment to run Kinetica's packaged Python version. You can
also run source /opt/gpudb/core/bin/gpudb_env.sh to have the current environment updated. |
gpudb_generate_key.sh |
No | Utility for generating an encryption key. See Obfuscating Plain-Text Passwords for details. |
gpudb_host_manager |
No | The host daemon process that starts and manages any Kinetica processes. |
gpudb_host_setup.sh |
No | Run as root. This script will set the OS configuration to an optimal state for Kinetica. |
gpudb_hosts_addresses.sh |
Yes | Prints all the unique hostnames (or IPs) specified in gpudb.conf |
gpudb_hosts_diff_file.sh |
Yes | Run as gpudb user or root. Utility to diff a given file from the current machine to the specified destination
file on one or more hosts |
gpudb_hosts_logfile_cleanup.sh |
Yes | Run as gpudb user or root. Script to delete old log files and optionally keep the last n logs |
gpudb_hosts_persist_clear.sh |
Yes | Run as Important: Only run this while the database is stopped. |
gpudb_hosts_persist_init_encryption.sh |
Yes | Run as gpudb user. Clear the persist directories (specified in gpudb.conf) and initialize them to be
encrypted |
gpudb_hosts_persist_mount_encryption.sh |
Yes | Run as gpudb user. Script to mount the already-initialized, encrypted persist directories (specified in
gpudb.conf). If an encrypted persist directory is detected and the gpudb.conf parameter
persist_encryption_pass_command is valid, the gpudb executable (see above) will automatically mount the
persist directory using this command if it was not mounted already. |
gpudb_hosts_persist_umount_encryption.sh |
Yes | Run as gpudb user. Script to unmount the already-mounted, encrypted persist directories (specified in
gpudb.conf). If the gpudb.conf parameter persist_encryption_pass_command is valid, the persist
directories will be unmounted by the gpudb executable (see above) when the database has stopped. |
gpudb_hosts_rsync_to.sh |
Yes | Run as gpudb user. Script to copy files from this server to the remove servers using rsync |
gpudb_hosts_ssh_copy_id.sh |
Yes | Run as Important: This script should be re-run after changing the host configuration to redistribute the keys |
gpudb_hosts_ssh_execute.sh |
Yes | Run as gpudb user or root. Script to execute a program with arguments on all hosts specified in
gpudb.conf, e.g., ./gpudb_hosts_ssh_execute.sh "ps aux" or ./gpudb_hosts_ssh_execute.sh "hostname" |
gpudb_keygen |
No | Executable to generate and print a machine key. You can use the key to obtain a license from support@kinetica.com |
gpudb_logger.sh |
No | Rolling logger utility to help manage the size and number of logs available |
gpudb_log_plot_job_completed_time.sh |
No | Plots job completion time statistics using gnuplot |
gpudb_machine_info.sh |
No | Script to print OS config information that affects performance as well as suggestions to improve performance |
gpudb_nvidia_setup.sh |
No | Utility to configure the Nvidia GPU devices for best performance or restore defaults. Root permission is required to change values. Utility reports informational settings and permission errors when run as user |
gpudb_open_files.sh |
No | Script to print the files currently open by the database |
gpudb_process_monitor.py |
No | Script to check a process list against a matching regular expression and print a log to stdout when the process is started or stopped. The script can also run a program, send emails, and/or SNMP alerts when the process starts or stops. The script can be configured using a configuration file, but note that some settings can be overridden from the command line. |
gpudb_sysinfo.sh |
No | More information when run as root. Script to print a variety of information about the system and hardware for
debugging. You can also make a .tgz file of the output. Rerun this program as needed to keep records of
the system. Use a visual diff program to compare two or more system catalogs |
gpudb_test_start_stop.sh |
No | Script to test starting and stopping all Kinetica components. |
gpudb_udf_distribute_thirdparty.sh |
Yes | Utility to mirror the local /opt/gpudb/udf/thirdparty to remote hosts. Creates a dated backup on the remote
host before copying |
gpudb_useradd.sh |
No | Script to create the gpudb:gpudb and gpudb_proc:gpudb_proc user:groups and SSH id. This script can be
rerun as needed to restore the user:groups and ssh config. Be sure to rerun (on the head node only)
gpudb_hosts_ssh_copy_id.sh to redistribute the SSH keys if desired whenever the SSH keys are changed |
Logging
The best way to troubleshoot any issues is by searching through the available logs. For more information on changing the format of the logs, see Custom Logging. Each component in Kinetica has its own log, the location of which is detailed below:
| Component | Log Location |
|---|---|
| Active Analytics Workbench (AAW) (API) | /opt/gpudb/kml/logs/ |
| Active Analytics Workbench (AAW) (UI) | /opt/gpudb/kml/ui/logs/ |
| GAdmin (Tomcat) | /opt/gpudb/tomcat/logs/ |
| Graph Server | /opt/gpudb/graph/logs/ |
| KAgent (Service) | /opt/gpudb/kagent/logs/ |
| KAgent (UI) | /opt/gpudb/kagent/ui/logs/ |
| Kinetica system logs | /opt/gpudb/core/logs/ |
| Reveal | /opt/gpudb/connector/reveal/logs/ |
| SQL Engine | /opt/gpudb/sql/logs/ |
| Stats Server | /opt/gpudb/stats/logs/ |
| Text Server | /opt/gpudb/text/logs/ |
Additional Configuration
If additional edits to the database's configuration file are desired, e.g.,
UDFs (procs), auditing, etc., the database will need to be stopped and the
file will need to be updated. System configuration is done primarily through the
configuration file /opt/gpudb/core/etc/gpudb.conf, and while all nodes
in a cluster have this file, only the copy on the head node needs to be
modified. The configuration file can be edited via GAdmin or via a text editor
on the command line.
Important
Only edit the /opt/gpudb/core/etc/gpudb.conf on the
head node. Editing the file on worker nodes is not supported and may
lead to unexpected results.
Some common configuration options to consider updating:
Enabling multi-head ingest
Enabling auditing
Changing the persist directory
Important
The directory should meet the following criteria:
- Available disk space that is at least 4x memory
- Writable by the
gpudbuser - Consist of raided SSDs
- Not be part of a network share or NFS mount
Enabling UDFs (procs)
Adjusting storage tiers and resource groups
To edit the configuration file via GAdmin:
- Log into GAdmin
- Enter
adminfor the Username - Enter the Admin Password provided to KAgent for the Password (refer to KAgent UI for more information)
- Click Log In
- Enter
- Stop the system.
- Navigate to
- Edit the file in the text window.
- Click Update, then click Start Service.
To edit the configuration file via command line:
- Stop the system.
- Open
/opt/gpudb/core/etc/gpudb.confin the desired text editor. - Edit and save the file.
- Start the system.