Note
This documentation is for a prior release of Kinetica. For the latest documentation, click here.
The user & role interface is situated in the right-hand pane of Kinetica's Workbench administration application. It can be used to manage users, roles, and privileges to all objects in the database.
To access the user & role management page, in Workbench, select Users & Roles from the Manage menu item drop-down.
At any time, the refresh icon in the top right can be clicked to update the list of users or roles.
Users
User management can be reached by clicking on the Users tab, and is the default landing page when entering the user & role management feature.
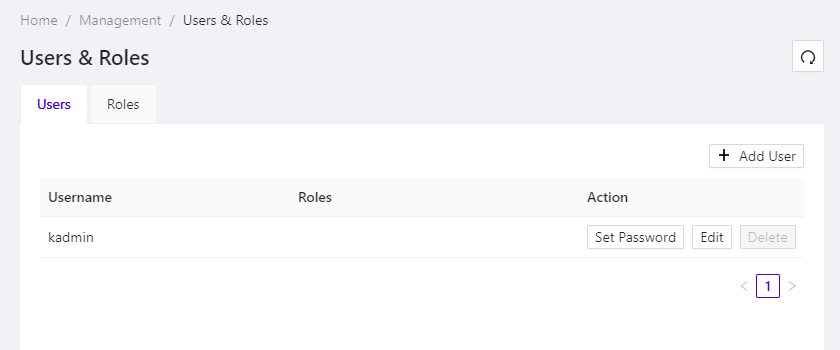
Manage Users Tab
At the center is a paged list of all the users in the system, listing the name of the user and any custom roles assigned directly to the user. Also, for each user, are three action buttons:
- Set Password - change the current password
- Edit - change the attributes of the user, including name and assigned roles & permissions
- Delete - permanently remove the user from the system
At the top, click + Add User to create a new user.
At the bottom are controls for paging through the list of users.
Creating or Modifying a User
The layout for the Create User & Edit User pages is similar. Both user attributes and permissions can be set.
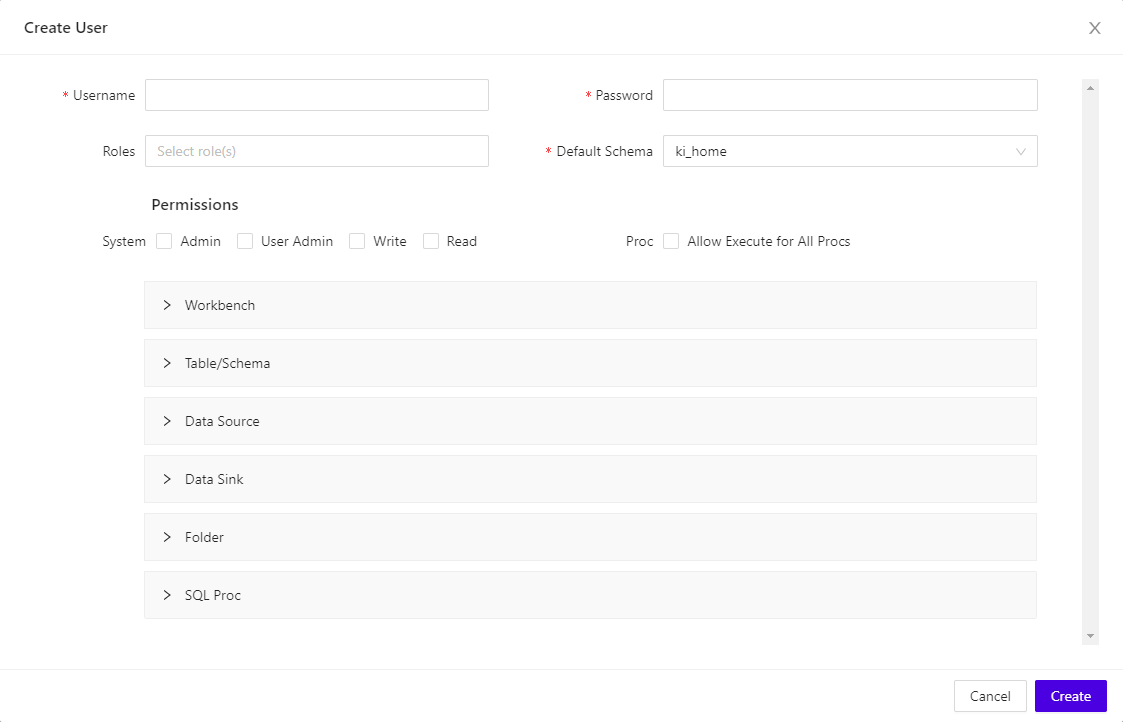
Add/Edit User Page
User Attributes
- Username (able to be set only when adding a user)
- Password (only visible when adding a user)
- Roles - these correspond to the
custom roles assigned to
the user
- Click the drop-down and check any roles to grant them
- Click the drop-down and uncheck any roles to revoke them
- Default Schema - the default schema for the user
User Permissions
Any of the following categories of permissions can be set.
- System - these correspond to permissions on the cluster itself, and are independent of any Workbench permissions
- Proc - this corresponds to the global execute UDF permission
- Workbench - these are
Workbench-specific permissions that are active
even when the cluster is in a suspended state; the
Available box lists permissions that are not assigned to
the user, while the Selected box lists permissions that are
assigned
- Check any permissions in the Available box and then click the right arrow to the right to grant permissions
- Check any permissions in the Selected box and then click the left arrow to the left to revoke permissions
- Table/Schema - these correspond to permissions on specific
schemas,
tables, &
views; the grid lists all
schemas, tables, & views to which the user has access and the corresponding
access for each
- Select any table, view, or schema from the Table/Schema drop-down, then click Add to add it to the list. Then, check the permission boxes to grant those permissions to the corresponding table/view/schema.
- Click Delete to remove all access to the corresponding table/view/schema.
- At the bottom are controls for paging through the list of tables/views/schemas to which access has been granted.
- Data Source - these correspond to permissions on specific
data sources; the grid lists all data sources to which the user has access and
the corresponding
access for each
- Select any data source from the Data Source drop-down, then click Add to add it to the list. Then, check the permission boxes to grant those permissions to it.
- Click Delete to remove all access to the corresponding data source.
- At the bottom are controls for paging through the list of data sources to which access has been granted.
- Data Sink - these correspond to permissions on specific
data sinks; the grid lists all data sinks to which the user has access and
the corresponding
access for each
- Select any data sink from the Data Sink drop-down, then click Add to add it to the list. Then, check the permission boxes to grant those permissions to it.
- Click Delete to remove all access to the corresponding data sink.
- At the bottom are controls for paging through the list of data sinks to which access has been granted.
- Folder - these correspond to permissions on specific
directories in KiFS, inclusive of all the files
contained with each directory; the grid lists all directories to which the
user has access and the corresponding
access for each
- Select any directory from the Folder drop-down, then click Add to add the directory to the list. Then, check the permission boxes to grant those permissions to the corresponding directory.
- Click Delete to remove all access to the corresponding directory.
- At the bottom are controls for paging through the list of directories to which access has been granted.
- SQL Proc - these correspond to permissions on specific
SQL procedures; the
Available box lists SQL procedures that the user cannot
execute, while the Selected box lists SQL procedures that
the user can execute
- Check any SQL procedures in the Available box and then click the right arrow to the right to grant execute permission on them
- Check any SQL procedures in the Selected box and then click the left arrow to the left to revoke execute permission on them
Roles
Role management can be reached by clicking on the Roles tab.
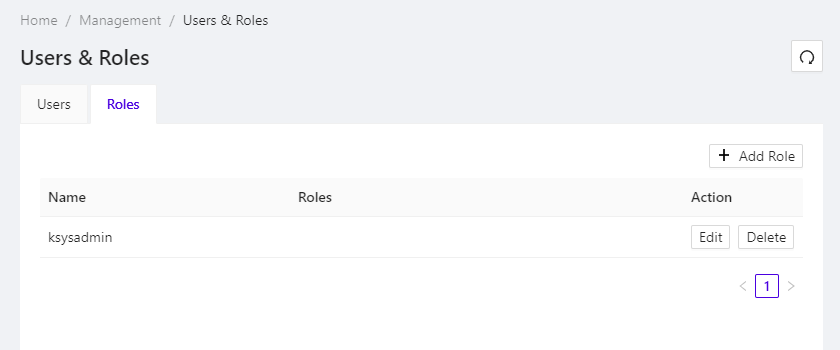
Manage Roles Tab
At the center is a paged list of all the roles in the system, listing the name of the role and any custom roles assigned directly to that role. Also, for each role, are two action buttons:
- Edit - change the attributes of the role, including name and assigned roles & permissions
- Delete - permanently remove the role from the system, revoking the role from any users & roles that have it
At the top, click + Add Role to create a new role.
At the bottom are controls for paging through the list of roles.
Creating or Modifying a Role
The layout for the Create Role & Edit Role pages is similar. Both role attributes and permissions can be set.
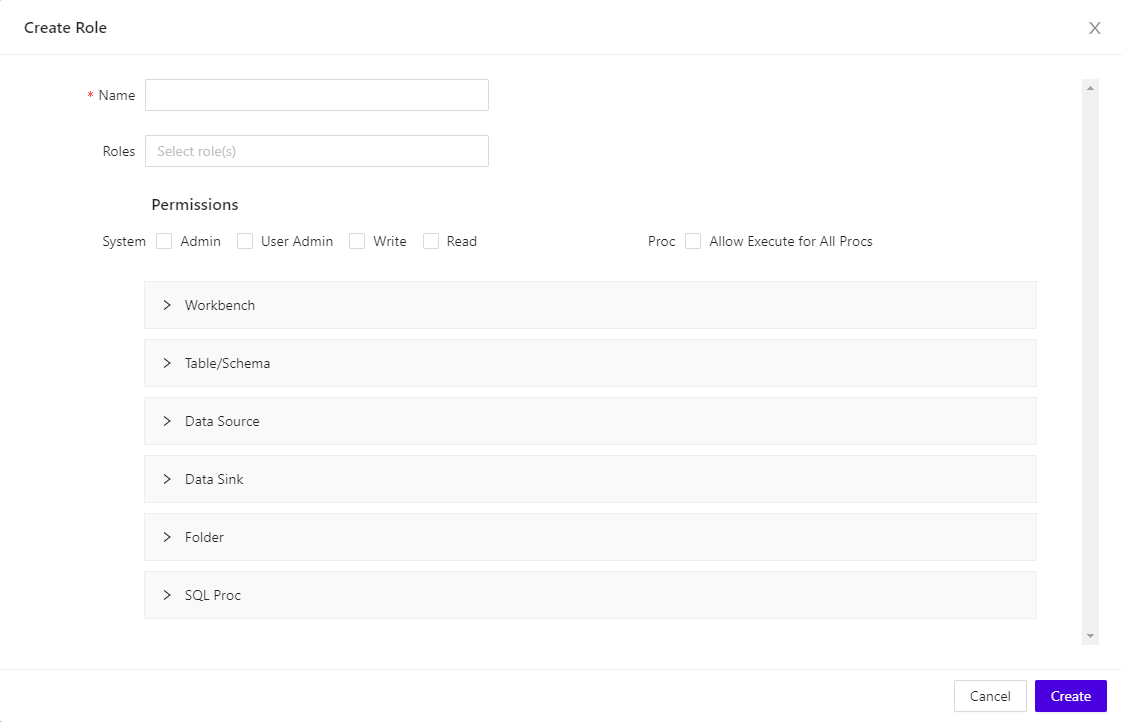
Add/Edit Role Page
Role Attributes
- Name (able to be set only when adding a role)
- Roles - these correspond to the
custom roles assigned to
this role
- Click the drop-down and check any roles to grant them
- Click the drop-down and uncheck any roles to revoke them
Role Permissions
Any of the following categories of permissions can be set.
- System - these correspond to permissions on the cluster itself, and are independent of any Workbench permissions
- Proc - this corresponds to the global execute UDF permission
- Workbench - these are
Workbench-specific permissions that are active
even when the cluster is in a suspended state; the
Available box lists permissions that are not assigned to
the role, while the Selected box lists permissions that are
assigned
- Check any permissions in the Available box and then click the right arrow to the right to grant permissions
- Check any permissions in the Selected box and then click the left arrow to the left to revoke permissions
- Table/Schema - these correspond to permissions on specific
schemas,
tables, &
views; the grid lists all
schemas, tables, & views to which a user with this role has access and the
corresponding access for each
- Select any table, view, or schema from the Table/Schema drop-down, then click Add to add it to the list. Then, check the permission boxes to grant those permissions to the corresponding table/view/schema.
- Click Delete to remove all access to the corresponding table/view/schema.
- At the bottom are controls for paging through the list of tables/views/schemas to which access has been granted.
- Data Source - these correspond to permissions on specific
data sources; the grid lists all data sources to which a user with this role
has access and the corresponding
access for each
- Select any data source from the Data Source drop-down, then click Add to add it to the list. Then, check the permission boxes to grant those permissions to it.
- Click Delete to remove all access to the corresponding data source.
- At the bottom are controls for paging through the list of data sources to which access has been granted.
- Data Sink - these correspond to permissions on specific
data sinks; the grid lists all data sinks to which a user with this role has
access and the corresponding
access for each
- Select any data sink from the Data Sink drop-down, then click Add to add it to the list. Then, check the permission boxes to grant those permissions to it.
- Click Delete to remove all access to the corresponding data sink.
- At the bottom are controls for paging through the list of data sinks to which access has been granted.
- File - these correspond to permissions on specific
directories in KiFS, inclusive of all the files
contained with each directory; the grid lists all directories to which a user
with this role has access and the corresponding
access for each
- Select any directory from the File drop-down, then click Add to add the directory to the list. Then, check the permission boxes to grant those permissions on the corresponding directory.
- Click Delete to remove all access to the corresponding directory.
- At the bottom are controls for paging through the list of directories to which access has been granted.
- SQL Proc - these correspond to permissions on specific
SQL procedures; the
Available box lists SQL procedures that a user with this
role cannot execute, while the Selected box lists SQL
procedures that a user with this role can execute
- Check any SQL procedures in the Available box and then click the right arrow to the right to grant execute permission on them
- Check any SQL procedures in the Selected box and then click the left arrow to the left to revoke execute permission on them