

Kinetica can be installed on pre-provisioned instances in AWS, Azure,
or GCP via KAgent. For offerings provisioned within cloud environments
directly, see Cloud-Ready.
System Requirements
Operating system, hardware, and network requirements to run Kinetica.Certified OS List
Minimum Hardware Requirements
GPU Driver Matrix
The cards below have been tested in large-scale production environments and provide the best performance for the database.Active Directory
If your environment uses Microsoft Active Directory for authentication and there are security processes running on servers that check for and automatically remove accounts that are not registered in Active Directory, thegpudb
user must be added to Active Directory as a Linux-type account prior
to installing Kinetica.
KAgent Installation
KAgent can be deployed as a RHEL, Ubuntu, or SUSE installation package on any server inside or outside the cluster. Automatically download & install the latest KAgent version using these commands:KAGENT_REPO link below to search for a specific
version of KAgent, change KAGENT_PKG to that version on line 2, and
then run the modified commands to download & install that version:
kagent_ui service. KAgent will open port 8081
on the local firewall (if enabled).
Kinetica Installation
Installation of Kinetica using KAgent involves the automated deployment of the installation package via either a browser-based UI or console-driven CLI.A list of the IP addresses for server(s) running Kinetica and additional
KAgent instance(s) must be compiled before the installation process. The
installation process also requires a license key. To receive a license
key, contact support at support@kinetica.com.
KAgent UI
-
Ensure the KAgent service is started:
-
Browse to the KAgent UI using IP or host name:
-
Optionally, if using custom rings, i.e. not the
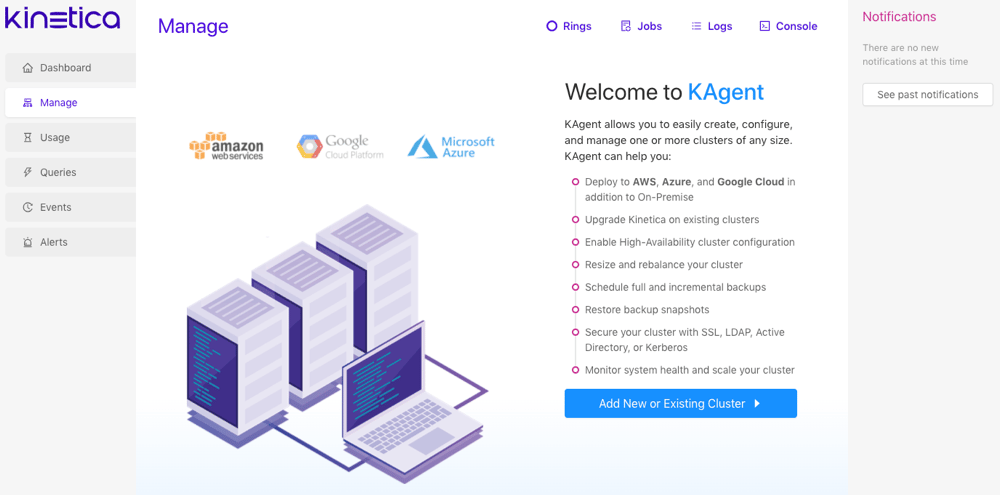
defaultring, click Rings then click Clusters next to the desired ring. See High Availability Architecture for more information about rings and high availability (HA). - Click Add New or Existing Cluster.
Cluster
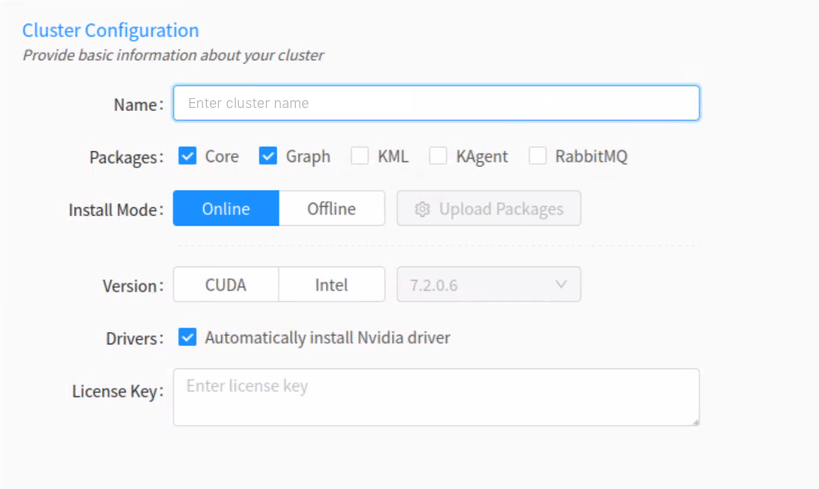
- Enter a name for the cluster. The name cannot contain spaces or underscores.
-
Optionally, select one or more of the following packages:
-
Select Core if node(s) in the cluster should have the
core database functionality installed on them.
First-time setups should always have Core selected.
- Select Graph if a node in the cluster should have the graph server installed on it. See Graphs & Solvers Concepts for more information.
- Optionally, select to install KML (Kinetica Machine Learning) if a node should have KML installed on it. An existing Kubernetes cluster is required for KML processing. See Machine Learning for more information on KML features.
- Optionally, select to install KAgent if a node should also have KAgent installed on it. See KAgent for more information.
- Optionally, select to install RabbitMQ if setting up a ring for High Availability. Review High Availability Architecture and High Availability Configuration & Management for more information.
-
Select Core if node(s) in the cluster should have the
core database functionality installed on them.
-
For the Install Mode, select either
Online (install directly from the online Kinetica
repository) or Offline (install from uploaded packages).
If Offline is selected, click
Upload Packages, then upload a package file for each
component or driver desired for the installation.
If performing an offline installation, all necessary dependencies will need to be installed prior to cluster setup.
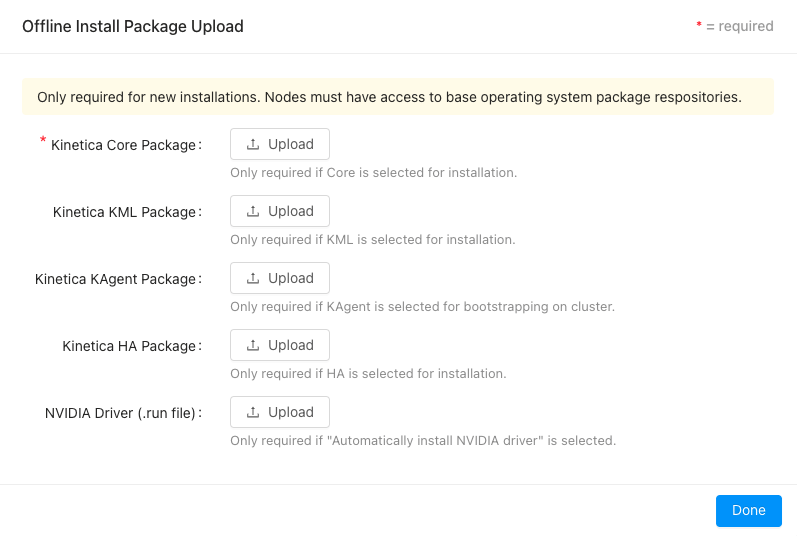
- For the Version, select either CUDA (GPU) or Intel (CPU-only) to determine the package variant to install.
- If the Version is set to CUDA, ensure Automatically install Nvidia driver is selected. This will automatically configure the server(s) for an Nvidia GPU driver and install the most compatible driver.
- Enter the license key.
- If KML is selected to install, upload a configuration file for an already-existing Kubernetes installation. Note that KML requires Kubernetes; see Machine Learning for more information.
- Click Next.
Deployment
-
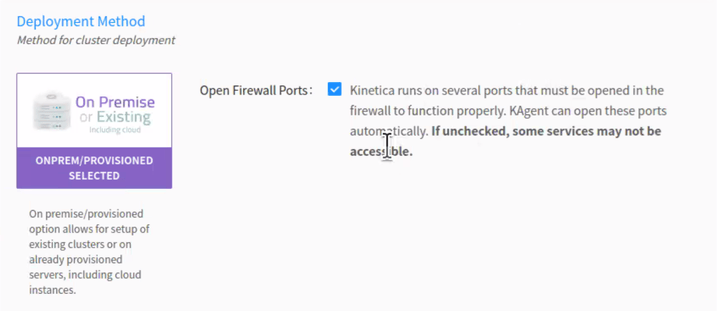
Select the On Premise deployment method, and click
Next.
If clearing the Open Firewall Ports checkbox, the firewall then must be configured manually to allow the required ports listed in the default ports table. Consult Adjust Firewall for tips on configuring the firewall.
Security
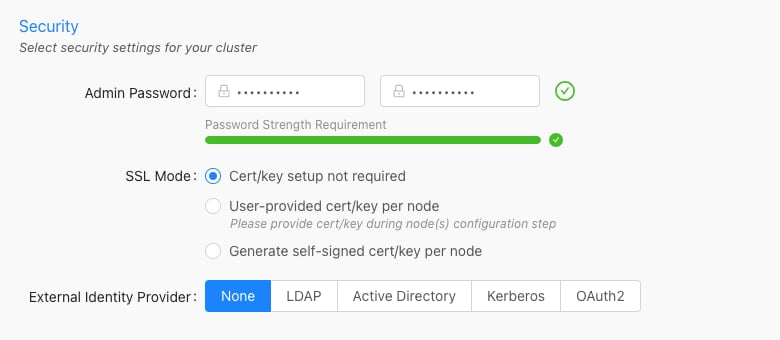
The Security configuration section is only required if Core
is being installed.
-
Enter and confirm an Admin Password. It must meet
the password strength requirements.
This is the password used to access Reveal, Workbench, KAgent, and GAdmin as the default administrative user.
-
Select an SSL Mode:
- Cert/key setup not required — Kinetica will not require SSL certificate/key creation/upload and SSL will not be enabled
- User-provided cert/key per node — user must upload an SSL certificate and key for each node; Kinetica copies the cert/key pair to /opt/gpudb/certs, enables HTTPD, and configures HTTPD to use HTTPS
- Generate self-signed cert/key per node — KAgent generates a self-signed certificate and key for each node and places it in /opt/gpudb/certs, enables HTTPD, and configures HTTPD to use HTTPS
-
Select an Authentication type and fill the fields as necessary:
- None — no authentication or authorization
- LDAP — configures Kinetica to authenticate via LDAP; requires authentication to connect to the database, enables authorization, enables external authentication, automatically creates users in the database for LDAP users, and automatically grants roles in the database to LDAP users
- Active Directory — configures Kinetica to authenticate via Microsoft Active Directory; requires authentication to connect to the database, enables authorization, enables external authentication, automatically creates users in the database for Active Directory users, and automatically grants roles in the database to Active Directory users
- Kerberos — configures Kinetica to authenticate via Kerberos; requires authentication to connect to the database, enables authorization, enables external authentication, automatically creates users in the database for Kerberos users, and automatically grants roles in the database to Kerberos users
- OAuth — configures Kinetica to authenticate via an OAuth service; requires authentication to connect to the database, enables authorization, enables external authentication, automatically creates user in the database for OAuth users, and automatically grants roles in the database to OAuth users
- Click Next.
Nodes
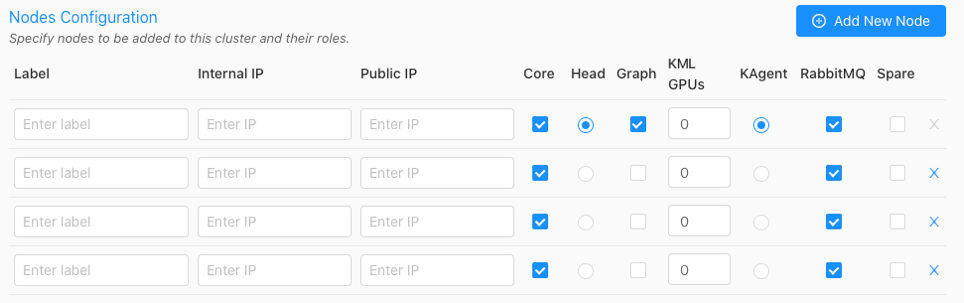
- Click Add New Node until there are the desired number of nodes that will have Kinetica (and potentially other services) installed on them.
- For each node, input a custom Label (hostname is suggested), the Internal IP, and the Public IP.
-
If the
User-provided cert/key per nodeSSL Mode was selected in Security, an SSL column will be added to the configuration page—click the lock icon in the SSL column to open the SSL Certificate/Key window, where the SSL cert and key, along with an optional public hostname, can be provided. Repeat this for each node. - Optionally, select if each node should have the Core package installed. The Core package contains access to the database and its core components and functionality. Note that if the core package is not installed on a node, that node cannot be designated as the Head Node.
-
Select the desired node for the Head Node using the corresponding
radio button. This server will receive user requests and parcel them out to
the other worker nodes of the system. The head node of the cluster (or
only node in a single-node system) will also be used for the administration
of the cluster, and by default, the hosting of
Reveal and
GAdmin and as such, will require special handling
during the installation process.
All services and privileges (Head, Graph, KML, etc.) can exist on a single node if desired, assuming there are enough resources to handle it.
- If the Graph package was selected for install in Cluster, select the desired node(s) to host the graph service using the corresponding radio button. The graph node does not need to have the Core package enabled. Consult Distributed Graph Servers for more information on leveraging multiple graph servers.
-
To reserve GPUs for KML, UDFs, or other external processes that may be
running on the node, set the number under KML GPUs.
Some UDFs and features of KML may require GPUs to work or have increased performance.
- If the KAgent package was selected for install in Cluster, select the desired node to host the service. The KAgent node does not need to have the Core package enabled.
-
If the RabbitMQ package was selected for install in
Cluster because a High Availability
setup is required, select the desired node(s) to have RabbitMQ
installed. Ensure at least one node will have RabbitMQ installed if enabling
High Availability (HA) for the cluster; select
additional nodes to have RabbitMQ installed for redundant queues. A node
does not have to host any other services other than RabbitMQ if desired.
In total, an odd number of nodes should be selected for RabbitMQ installation. Kinetica recommends installing RabbitMQ machines that will not have the Core package enabled.
- Click Next.
- Confirm which IP address KAgent should use to connect to the cluster: Internal or Public.
Credentials
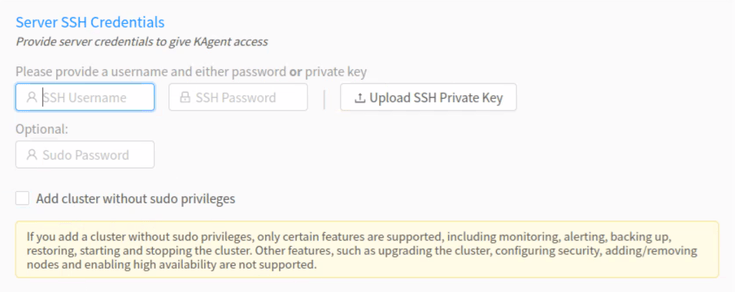
- For the Server SSH Credentials, enter the SSH username and password or upload the SSH private key that will be used to access the node(s).
- Optionally, enter the
sudopassword. - Click Verify.
Installation
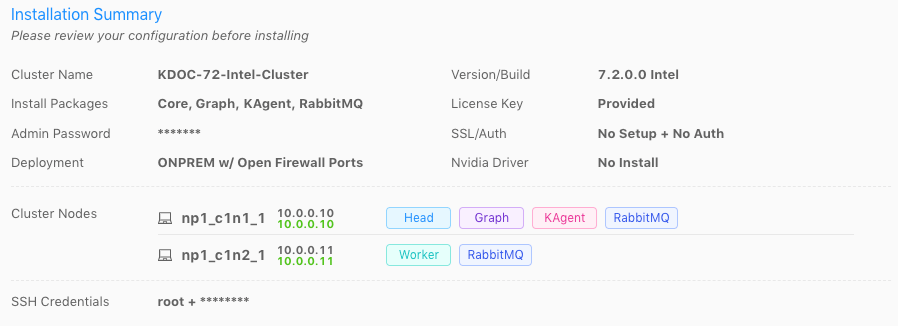
-
Review the Installation Summary to ensure there are no validation
errors in the information. The highlighted IP address will be the one KAgent
uses to connect to the cluster.
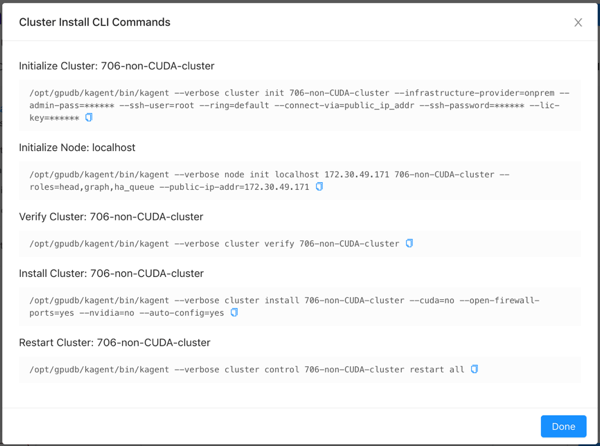
Click CLI Commands to view and/or copy the KAgent command line interface commands that will be run in the background (order is from top to bottom).
-
Click Install. KAgent will open a window displaying the
progress of the installation.
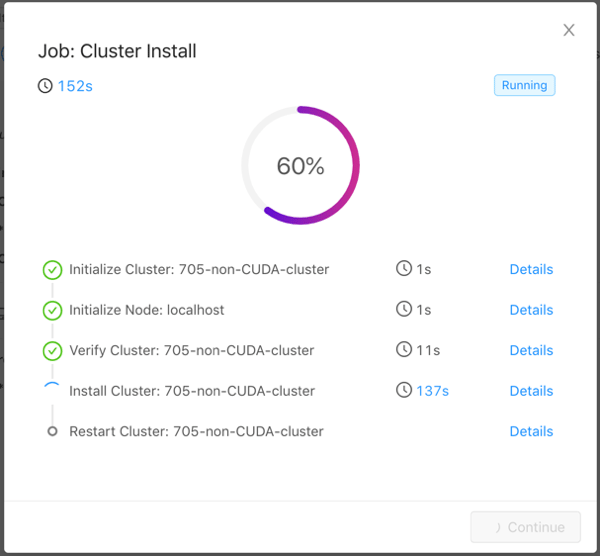 Click Details next to a step to see stdout and stderr for that step. Click
 to copy the displayed text.
gpudb, and creates two users (gpudb & gpudb_proc) whose home
directories are located in /home/gpudb. This will also register two
services: gpudb & gpudb_host_manager.
After a successful installation, if KAgent was also
installed on a separate node, one can be redirected to the KAgent on that
cluster node. If KAgent was not installed on a separate node, one can be
redirected to Kinetica Administration Application (GAdmin).
After the installation, the cluster will be added to KAgent
and you’ll be logged into KAgent as the
admin user for
the cluster. After this session is over (via either logging out
or session timeout), you’ll be required to log into KAgent
every time you want to access KAgent features. See
Logging In / Out for more information.Validation
To validate that Kinetica has been installed and started properly, you can perform the following tests.Curl Test
To ensure that Kinetica has started (you may have to wait a moment while the system initializes), you can runcurl on the head node to check if
the server is responding and port is available with respect to any running
firewalls:
API Test
You can also run a test to ensure that the API is responding properly. There is an admin simulator project in Python provided with the Python API, which pulls statistics from the Kinetica instance. Running this on the head node, passing in the appropriate<username> & <password>, you should see:
GAdmin Status Test
The administrative interface itself can be used to validate that the system is functioning properly. Simply log into GAdmin. Browse to Dashboard to view the status of the overall system and Ranks to view the status breakdown by rank.Ingest/Read Test
After verifying Kinetica has started and its components work, you should confirm ingesting and reading data works as expected.- Navigate to the Demo tab on the Cluster page.
- Click Load Sample Data under the NYC Taxi section, then click Load to confirm.
- Once the data is finished loading, click View Loaded Data. The
data should be available in the
nyctaxitable located in thedemoschema.
-
Navigate to:
- Log into Reveal and change the administration account’s default password.
- Click NYC Taxi under Dashboards. The default NYC Taxi dashboard should load.
Core Utilities
Kinetica comes packaged with many helpful server and support executables that can be found in/opt/gpudb/core/bin/ and /opt/gpudb/bin. Note that any
of the gpudb_hosts_*.sh scripts will operate on the hosts specified in
gpudb.conf. Run any of the following with the -h option for usage
information.
For most of the utilities that use passwordless SSH, an AWS PEM
file can be specified instead using the
-i option (with the exception
being the gpudb_hosts_persist_* scripts). If passwordless SSH is not
setup and no PEM file is specified, you will be prompted for a password
on each host.Environment Configuration and Tools
Some of the most commonly used and important utilities are also available in the/opt/gpudb/bin directory.
This directory also contains the KI Tools suite
Helper Scripts
Additional helper scripts and utilities are available in/opt/gpudb/core/bin.
Logging
The best way to troubleshoot any issues is by searching through the available logs. For more information on changing the format of the logs, see Custom Logging. Each component in Kinetica has its own log, the location of which is detailed below:Additional Configuration
If additional edits to the database’s configuration file are desired, e.g., UDFs (procs), auditing, etc., the database will need to be stopped and the file will need to be updated. System configuration is done primarily through the configuration file /opt/gpudb/core/etc/gpudb.conf, and while all nodes in a cluster have this file, only the copy on the head node needs to be modified. The configuration file can be edited via GAdmin or via a text editor on the command line.Only edit the /opt/gpudb/core/etc/gpudb.conf on the
head node. Editing the file on worker nodes is not supported and may
lead to unexpected results.
- Enabling auditing
-
Changing the persist directory
The directory should meet the following criteria:
- Available disk space that is at least 4x memory
- Writable by the
gpudbuser - Consist of raided SSDs
- Not be part of a network share or NFS mount
- Enabling UDFs (procs)
- Adjusting storage tiers and resource groups
-
Log into GAdmin
- Enter
adminfor the Username - Enter the Admin Password provided to KAgent for the Password (refer to KAgent UI for more information)
- Click Log In
- Enter
- Stop the system.
- Navigate to Cluster —> Config
- Edit the file in the text window.
- Click Update, then click Start Service.
- Stop the system.
- Open /opt/gpudb/core/etc/gpudb.conf in the desired text editor.
- Edit and save the file.
- Start the system.
Uninstallation
Should you need to uninstall Kinetica, you’ll need to shut down the system, remove the package, and remove related files, directories, & user accounts.- Stop the system
-
Remove the KAgent and Kinetica packages from your
machine:
-
Optionally, remove the Kinetica Machine Learning (KML) package from your
machine:
- Remove any user-defined persist directories (these directories are set in /opt/gpudb/core/etc/gpudb.conf)
-
Clean-up all Kinetica
artifacts:
-
Remove the gpudb & gpudb_proc users from the
machine:
-
Remove the gpudb group from the
machine: